How to Build an Add Money Screen in Flutter (Full Code + Preview)
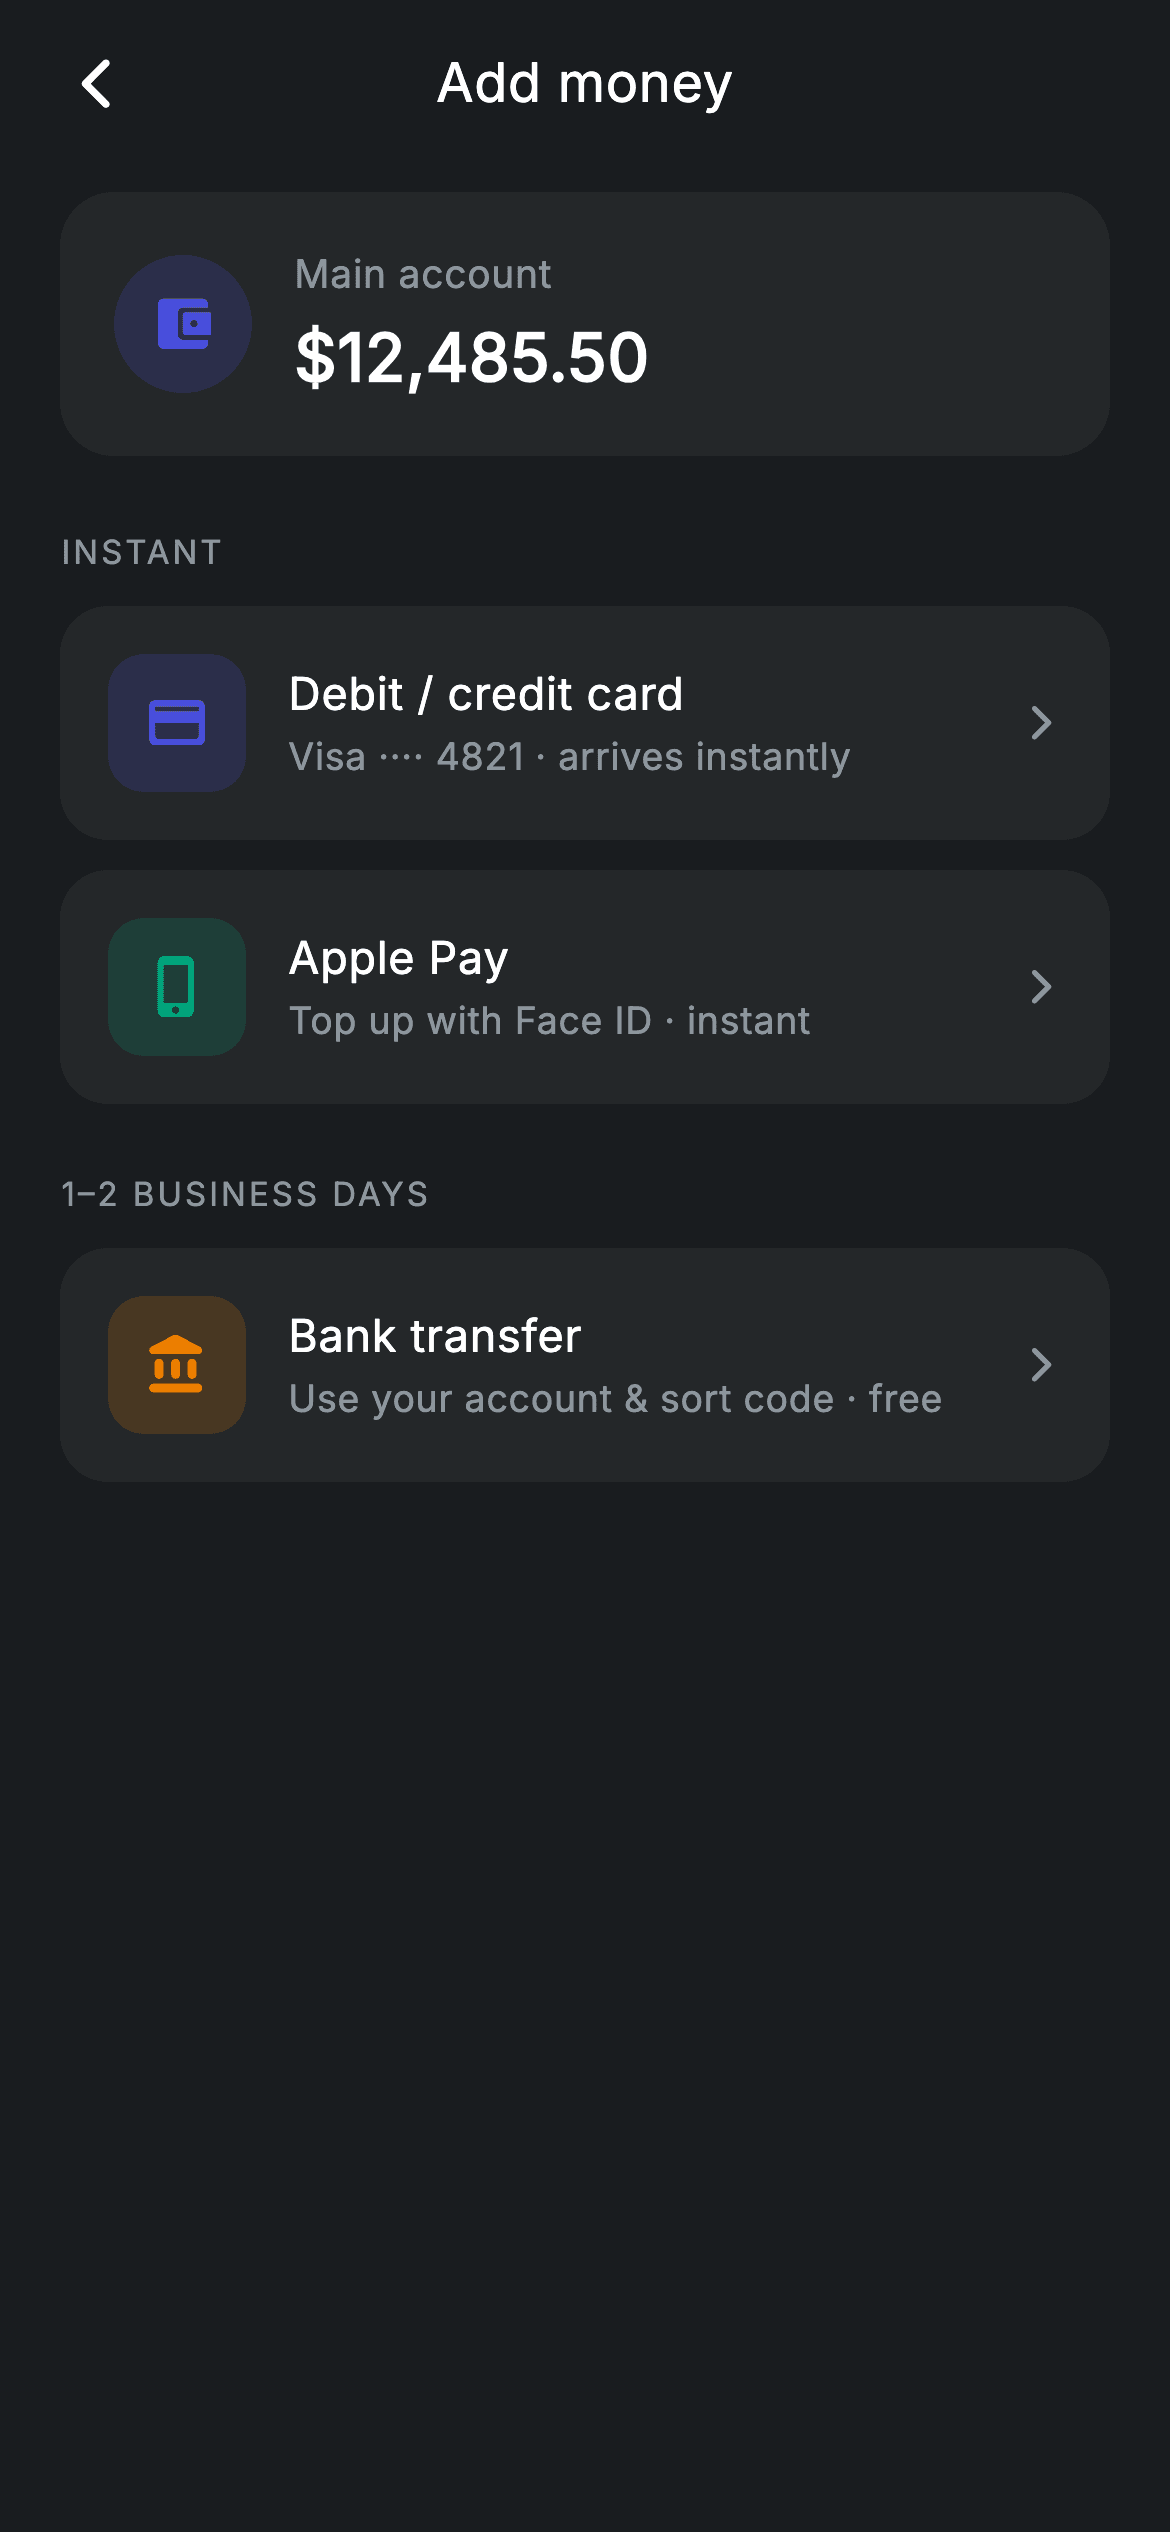
Top-up screens live or die on one thing: telling people how fast their money will land. This tutorial builds a Revolut-style Add Money screen in Flutter — a dark layout with a balance card, method tiles for card, Apple Pay and bank transfer, each with a tinted icon and a subtitle stating its speed and fee, all grouped under timing headers rather than payment-type headers. You'll see how a reusable tile widget borrows the parent's private tokens, and how Material plus InkWell gives a tappable card a real ripple.
Watch the Flutter UI walkthrough
A short screen recording of Add Money running, if you'd rather see it before you read the code. The written tutorial below covers everything in it.
Can't see the video? Watch it on YouTube.
What you'll build
- ✓A dark-theme top-up screen that forces its own theme so it works as a standalone route
- ✓Section headers that group methods by arrival time — 'Instant' versus '1–2 business days'
- ✓A reusable method tile with a tinted rounded icon, a two-line label and a chevron
- ✓Tap ripples clipped to the tile's 16px corners using Material and InkWell together
Step-by-step build
Create the file
Add a new file at lib/fintech_add_money/fintech_add_money_screen.dart in your Flutter project.
Register the bundled fonts
No external packages — this is pure Flutter. It does bundle its design font (Inter), so drop the font file into fonts/ and declare it in pubspec.yaml:
flutter:
  fonts:
    - family: Inter
      fonts:
- asset: fonts/Inter-Regular.ttfBuild it, piece by piece
Here's how the screen goes together. Each block below is a real slice of the code with a plain-English explanation — paste them in order, or grab the whole file from the next section.
The palette and three method callbacks
import 'package:flutter/material.dart';

/// Add money — choose a top-up method (Revolut-inspired design system).
///
/// Self-contained per CONVENTIONS.md: pure Flutter only, the exact design font
/// (Inter) is bundled under `fonts/`, no network/emoji images, and the screen
/// forces its own dark theme. Method tiles route to card top-up or bank
/// transfer-in; Apple/Google Pay are shown as available options.
class FintechAddMoneyScreen extends StatelessWidget {
  const FintechAddMoneyScreen({
    super.key,
    this.onBack,
    this.onCard,
    this.onBank,
  });

  final VoidCallback? onBack;
  final VoidCallback? onCard;
  final VoidCallback? onBank;

  static const String _font = 'Inter';
  static const Color _bg = Color(0xFF191C1F);
  static const Color _surface = Color(0xFF242729);
  static const Color _brand = Color(0xFF494FDF);
  static const Color _teal = Color(0xFF00A87E);
  static const Color _amber = Color(0xFFEC7E00);
  static const Color _muted = Color(0xFF8D969E);
The screen is stateless — it makes no choices itself, it just routes. Three callbacks are exposed: `onBack`, `onCard` and `onBank`. Note that `onCard` will be wired to two different tiles further down, since card and Apple Pay both lead to the same card top-up flow. The dark palette follows the same system as the rest of this fintech set: `_bg` (#191C1F) behind everything, `_surface` (#242729) for raised cards, and three accent tints — `_brand` indigo, `_teal` and `_amber` — that will each mark a different top-up method.
Grouping methods by arrival time
  @override
  Widget build(BuildContext context) {
    return Theme(
      data: ThemeData.dark(useMaterial3: true),
      child: Scaffold(
        backgroundColor: _bg,
        body: SafeArea(
          child: Column(
            children: <Widget>[
              _buildAppBar(),
              Expanded(
                child: ListView(
                  physics: const BouncingScrollPhysics(),
                  padding: const EdgeInsets.fromLTRB(20, 8, 20, 24),
                  children: <Widget>[
                    _buildBalance(),
                    const SizedBox(height: 24),
                    _sectionLabel('Instant'),
                    const SizedBox(height: 10),
                    _MethodTile(
                      icon: Icons.credit_card_rounded,
                      tint: _brand,
                      title: 'Debit / credit card',
                      sub: 'Visa ···· 4821 · arrives instantly',
                      onTap: onCard,
                    ),
                    const SizedBox(height: 10),
                    _MethodTile(
                      icon: Icons.phone_iphone_rounded,
                      tint: _teal,
                      title: 'Apple Pay',
                      sub: 'Top up with Face ID · instant',
                      onTap: onCard,
                    ),
                    const SizedBox(height: 22),
                    _sectionLabel('1–2 business days'),
                    const SizedBox(height: 10),
                    _MethodTile(
                      icon: Icons.account_balance_rounded,
                      tint: _amber,
                      title: 'Bank transfer',
                      sub: 'Use your account & sort code · free',
                      onTap: onBank,
                    ),
                  ],
                ),
              ),
            ],
          ),
        ),
      ),
    );
  }
The list's structure is the real design decision here. Instead of headers like 'Cards' and 'Banks', the sections are 'Instant' and '1–2 business days' — people topping up are almost always asking how fast, not what type. Under Instant sit the card tile in `_brand` and Apple Pay in `_teal`; under the slower header sits bank transfer in `_amber`, with the subtitle 'Use your account & sort code · free' making the trade-off explicit: slower, but no fee. The gaps are deliberate too — 10px between tiles inside a group, 22px before the next header, so the grouping reads from spacing alone.
A centred title without an AppBar
  Widget _buildAppBar() {
    return Padding(
      padding: const EdgeInsets.fromLTRB(8, 4, 8, 4),
      child: Row(
        children: <Widget>[
          IconButton(
            onPressed: onBack,
            icon: const Icon(Icons.arrow_back_ios_new_rounded,
                size: 20, color: Colors.white),
          ),
          const Expanded(
            child: Text(
              'Add money',
              textAlign: TextAlign.center,
              style: TextStyle(
                fontFamily: _font,
                fontSize: 18,
                fontWeight: FontWeight.w500,
                letterSpacing: 0.24,
                color: Colors.white,
              ),
            ),
          ),
          const SizedBox(width: 48),
        ],
      ),
    );
  }
The bar is hand-built from a Row. The trick that makes the title land dead centre is the last line: `const SizedBox(width: 48)`. An IconButton has a 48px minimum tap target, so without that spacer the Expanded title would centre itself in the space left after the back button and sit visibly off to the right. Adding a matching empty 48px on the trailing side balances the row, giving a true optical centre with no Stack and no AppBar. The title is 18px w500 with 0.24 letterSpacing, the tracking value used consistently across this design system.
The balance card
  Widget _buildBalance() {
    return Container(
      padding: const EdgeInsets.all(18),
      decoration: BoxDecoration(
        color: _surface,
        borderRadius: BorderRadius.circular(18),
      ),
      child: Row(
        children: <Widget>[
          Container(
            width: 46,
            height: 46,
            decoration: BoxDecoration(
              color: _brand.withValues(alpha: 0.18),
              shape: BoxShape.circle,
            ),
            child: const Icon(Icons.account_balance_wallet_rounded,
                size: 22, color: _brand),
          ),
          const SizedBox(width: 14),
          const Column(
            crossAxisAlignment: CrossAxisAlignment.start,
            children: <Widget>[
              Text(
                'Main account',
                style: TextStyle(
                  fontFamily: _font,
                  fontSize: 13,
                  letterSpacing: 0.24,
                  color: _muted,
                ),
              ),
              SizedBox(height: 2),
              Text(
                r'$12,485.50',
                style: TextStyle(
                  fontFamily: _font,
                  fontSize: 22,
                  fontWeight: FontWeight.w600,
                  letterSpacing: 0.24,
                  color: Colors.white,
                ),
              ),
            ],
          ),
        ],
      ),
    );
  }
The balance sits in an `_surface` Container with an 18px radius and a 46px circular wallet icon whose fill is `_brand.withValues(alpha: 0.18)` — the same 'tinted wash behind a solid glyph' pattern used for the method tiles, which is what makes them feel like one family. The label sits above the amount rather than below it, so the eye lands on the number. The amount is written as `r'$12,485.50'`; the raw-string prefix stops Dart trying to interpolate the `$`, which would otherwise be a compile error. Note the whole Column is `const`, so Flutter rebuilds nothing here across setStates elsewhere.
The uppercase section label
  Widget _sectionLabel(String text) {
    return Text(
      text.toUpperCase(),
      style: const TextStyle(
        fontFamily: _font,
        fontSize: 11,
        fontWeight: FontWeight.w500,
        letterSpacing: 1.0,
        color: _muted,
      ),
    );
  }
}
`_sectionLabel` is four lines but sets the whole rhythm of the page. It calls `text.toUpperCase()` in code rather than storing shouty strings in the data, so the call sites read naturally as 'Instant' and '1–2 business days'. The style is 11px w500 with `letterSpacing: 1.0` in `_muted` — small, widely tracked, low-contrast type is the standard treatment for a section eyebrow, and the wide tracking is what keeps uppercase text legible at that size instead of turning into a grey block.
The method tile with a real ripple
class _MethodTile extends StatelessWidget {
  const _MethodTile({
    required this.icon,
    required this.tint,
    required this.title,
    required this.sub,
    this.onTap,
  });

  final IconData icon;
  final Color tint;
  final String title;
  final String sub;
  final VoidCallback? onTap;

  @override
  Widget build(BuildContext context) {
    return Material(
      color: FintechAddMoneyScreen._surface,
      borderRadius: BorderRadius.circular(16),
      child: InkWell(
        borderRadius: BorderRadius.circular(16),
        onTap: onTap,
        child: Padding(
          padding: const EdgeInsets.all(16),
          child: Row(
            children: <Widget>[
              Container(
                width: 46,
                height: 46,
                decoration: BoxDecoration(
                  color: tint.withValues(alpha: 0.18),
                  borderRadius: BorderRadius.circular(12),
                ),
                child: Icon(icon, size: 22, color: tint),
              ),
              const SizedBox(width: 14),
              Expanded(
                child: Column(
                  crossAxisAlignment: CrossAxisAlignment.start,
                  children: <Widget>[
                    Text(
                      title,
                      style: const TextStyle(
                        fontFamily: FintechAddMoneyScreen._font,
                        fontSize: 15,
                        fontWeight: FontWeight.w500,
                        letterSpacing: 0.24,
                        color: Colors.white,
                      ),
                    ),
                    const SizedBox(height: 2),
                    Text(
                      sub,
                      style: const TextStyle(
                        fontFamily: FintechAddMoneyScreen._font,
                        fontSize: 12.5,
                        letterSpacing: 0.24,
                        color: FintechAddMoneyScreen._muted,
                      ),
                    ),
                  ],
                ),
              ),
              const Icon(Icons.arrow_forward_ios_rounded,
                  size: 14, color: FintechAddMoneyScreen._muted),
            ],
          ),
        ),
      ),
    );
  }
}
_MethodTile is a separate StatelessWidget so the three tiles share one definition. The tap handling is worth studying: instead of a GestureDetector, it uses `Material` for the background colour and `InkWell` for the tap, with the same `BorderRadius.circular(16)` passed to both. Material provides the surface the ink splash draws on, and giving InkWell the matching radius clips the ripple to the rounded corners rather than letting it spill into the square bounds. Inside, a 46px rounded tile filled with `tint.withValues(alpha: 0.18)` holds the icon at full tint, next to an `Expanded` title-and-subtitle column and a small chevron. Like the other screens in this set, the tile reaches the parent's tokens directly — `FintechAddMoneyScreen._surface`, `._font`, `._muted` — because Dart privacy is per-file, not per-class.
Full code
The complete, ready-to-paste source. Free to use in your projects — one click copies it all.
import 'package:flutter/material.dart';

/// Add money — choose a top-up method (Revolut-inspired design system).
///
/// Self-contained per CONVENTIONS.md: pure Flutter only, the exact design font
/// (Inter) is bundled under `fonts/`, no network/emoji images, and the screen
/// forces its own dark theme. Method tiles route to card top-up or bank
/// transfer-in; Apple/Google Pay are shown as available options.
class FintechAddMoneyScreen extends StatelessWidget {
  const FintechAddMoneyScreen({
    super.key,
    this.onBack,
    this.onCard,
    this.onBank,
  });

  final VoidCallback? onBack;
  final VoidCallback? onCard;
  final VoidCallback? onBank;

  static const String _font = 'Inter';
  static const Color _bg = Color(0xFF191C1F);
  static const Color _surface = Color(0xFF242729);
  static const Color _brand = Color(0xFF494FDF);
  static const Color _teal = Color(0xFF00A87E);
  static const Color _amber = Color(0xFFEC7E00);
  static const Color _muted = Color(0xFF8D969E);

  @override
  Widget build(BuildContext context) {
    return Theme(
      data: ThemeData.dark(useMaterial3: true),
      child: Scaffold(
        backgroundColor: _bg,
        body: SafeArea(
          child: Column(
            children: <Widget>[
              _buildAppBar(),
              Expanded(
                child: ListView(
                  physics: const BouncingScrollPhysics(),
                  padding: const EdgeInsets.fromLTRB(20, 8, 20, 24),
                  children: <Widget>[
                    _buildBalance(),
                    const SizedBox(height: 24),
                    _sectionLabel('Instant'),
                    const SizedBox(height: 10),
                    _MethodTile(
                      icon: Icons.credit_card_rounded,
                      tint: _brand,
                      title: 'Debit / credit card',
                      sub: 'Visa ···· 4821 · arrives instantly',
                      onTap: onCard,
                    ),
                    const SizedBox(height: 10),
                    _MethodTile(
                      icon: Icons.phone_iphone_rounded,
                      tint: _teal,
                      title: 'Apple Pay',
                      sub: 'Top up with Face ID · instant',
                      onTap: onCard,
                    ),
                    const SizedBox(height: 22),
                    _sectionLabel('1–2 business days'),
                    const SizedBox(height: 10),
                    _MethodTile(
                      icon: Icons.account_balance_rounded,
                      tint: _amber,
                      title: 'Bank transfer',
                      sub: 'Use your account & sort code · free',
                      onTap: onBank,
                    ),
                  ],
                ),
              ),
            ],
          ),
        ),
      ),
    );
  }

  Widget _buildAppBar() {
    return Padding(
      padding: const EdgeInsets.fromLTRB(8, 4, 8, 4),
      child: Row(
        children: <Widget>[
          IconButton(
            onPressed: onBack,
            icon: const Icon(Icons.arrow_back_ios_new_rounded,
                size: 20, color: Colors.white),
          ),
          const Expanded(
            child: Text(
              'Add money',
              textAlign: TextAlign.center,
              style: TextStyle(
                fontFamily: _font,
                fontSize: 18,
                fontWeight: FontWeight.w500,
                letterSpacing: 0.24,
                color: Colors.white,
              ),
            ),
          ),
          const SizedBox(width: 48),
        ],
      ),
    );
  }

  Widget _buildBalance() {
    return Container(
      padding: const EdgeInsets.all(18),
      decoration: BoxDecoration(
        color: _surface,
        borderRadius: BorderRadius.circular(18),
      ),
      child: Row(
        children: <Widget>[
          Container(
            width: 46,
            height: 46,
            decoration: BoxDecoration(
              color: _brand.withValues(alpha: 0.18),
              shape: BoxShape.circle,
            ),
            child: const Icon(Icons.account_balance_wallet_rounded,
                size: 22, color: _brand),
          ),
          const SizedBox(width: 14),
          const Column(
            crossAxisAlignment: CrossAxisAlignment.start,
            children: <Widget>[
              Text(
                'Main account',
                style: TextStyle(
                  fontFamily: _font,
                  fontSize: 13,
                  letterSpacing: 0.24,
                  color: _muted,
                ),
              ),
              SizedBox(height: 2),
              Text(
                r'$12,485.50',
                style: TextStyle(
                  fontFamily: _font,
                  fontSize: 22,
                  fontWeight: FontWeight.w600,
                  letterSpacing: 0.24,
                  color: Colors.white,
                ),
              ),
            ],
          ),
        ],
      ),
    );
  }

  Widget _sectionLabel(String text) {
    return Text(
      text.toUpperCase(),
      style: const TextStyle(
        fontFamily: _font,
        fontSize: 11,
        fontWeight: FontWeight.w500,
        letterSpacing: 1.0,
        color: _muted,
      ),
    );
  }
}

class _MethodTile extends StatelessWidget {
  const _MethodTile({
    required this.icon,
    required this.tint,
    required this.title,
    required this.sub,
    this.onTap,
  });

  final IconData icon;
  final Color tint;
  final String title;
  final String sub;
  final VoidCallback? onTap;

  @override
  Widget build(BuildContext context) {
    return Material(
      color: FintechAddMoneyScreen._surface,
      borderRadius: BorderRadius.circular(16),
      child: InkWell(
        borderRadius: BorderRadius.circular(16),
        onTap: onTap,
        child: Padding(
          padding: const EdgeInsets.all(16),
          child: Row(
            children: <Widget>[
              Container(
                width: 46,
                height: 46,
                decoration: BoxDecoration(
                  color: tint.withValues(alpha: 0.18),
                  borderRadius: BorderRadius.circular(12),
                ),
                child: Icon(icon, size: 22, color: tint),
              ),
              const SizedBox(width: 14),
              Expanded(
                child: Column(
                  crossAxisAlignment: CrossAxisAlignment.start,
                  children: <Widget>[
                    Text(
                      title,
                      style: const TextStyle(
                        fontFamily: FintechAddMoneyScreen._font,
                        fontSize: 15,
                        fontWeight: FontWeight.w500,
                        letterSpacing: 0.24,
                        color: Colors.white,
                      ),
                    ),
                    const SizedBox(height: 2),
                    Text(
                      sub,
                      style: const TextStyle(
                        fontFamily: FintechAddMoneyScreen._font,
                        fontSize: 12.5,
                        letterSpacing: 0.24,
                        color: FintechAddMoneyScreen._muted,
                      ),
                    ),
                  ],
                ),
              ),
              const Icon(Icons.arrow_forward_ios_rounded,
                  size: 14, color: FintechAddMoneyScreen._muted),
            ],
          ),
        ),
      ),
    );
  }
}
Plus bundled 1 binary asset (fonts/images). The CLI and MCP install those for you automatically.
Two faster ways to add it
Copy-paste works, but you can skip it entirely.
1. FlutterKit CLI
One command drops this screen — and its fonts — straight into your project.
$ flutterkit add fintech-add-money2. AI agent (MCP)
Connect FlutterKit's MCP server in Claude or Cursor and just ask your agent to install fintech-add-money — it fetches and writes the files for you.
FAQ
Is this Flutter add money screen free to use?
Yes. The complete Dart source on this page is free for personal and commercial projects. Copy it directly, install it with the FlutterKit CLI (flutterkit add fintech-add-money), or have an AI agent add it for you over MCP.
Why does the Apple Pay tile call onCard instead of its own callback?
Because both land in the same place — an Apple Pay top-up is a card top-up with a different authorisation step, so routing them to one handler avoids a duplicate flow. If you need to branch, add an `onApplePay` field alongside the others and pass it to that tile; nothing else in the screen changes. In a real app you'd also hide that tile on Android and swap in Google Pay.
Does it need any external packages?
No — it's pure Flutter on the material library, using built-in Material icons for all three methods and shipping no images. The only bundled asset is the Inter font, registered in pubspec.yaml as shown in step 2, which the CLI and MCP install for you.
Which Flutter version does it target?
It uses Color.withValues() and super parameters, so Flutter 3.22+ (Dart 3). On an older SDK, change the two withValues(alpha: 0.18) calls — the wallet circle and the tile icon tiles — to withOpacity(0.18) and everything else compiles unchanged.


