How to Build a Barcode Scanner Screen in Flutter (Full Code + Preview)
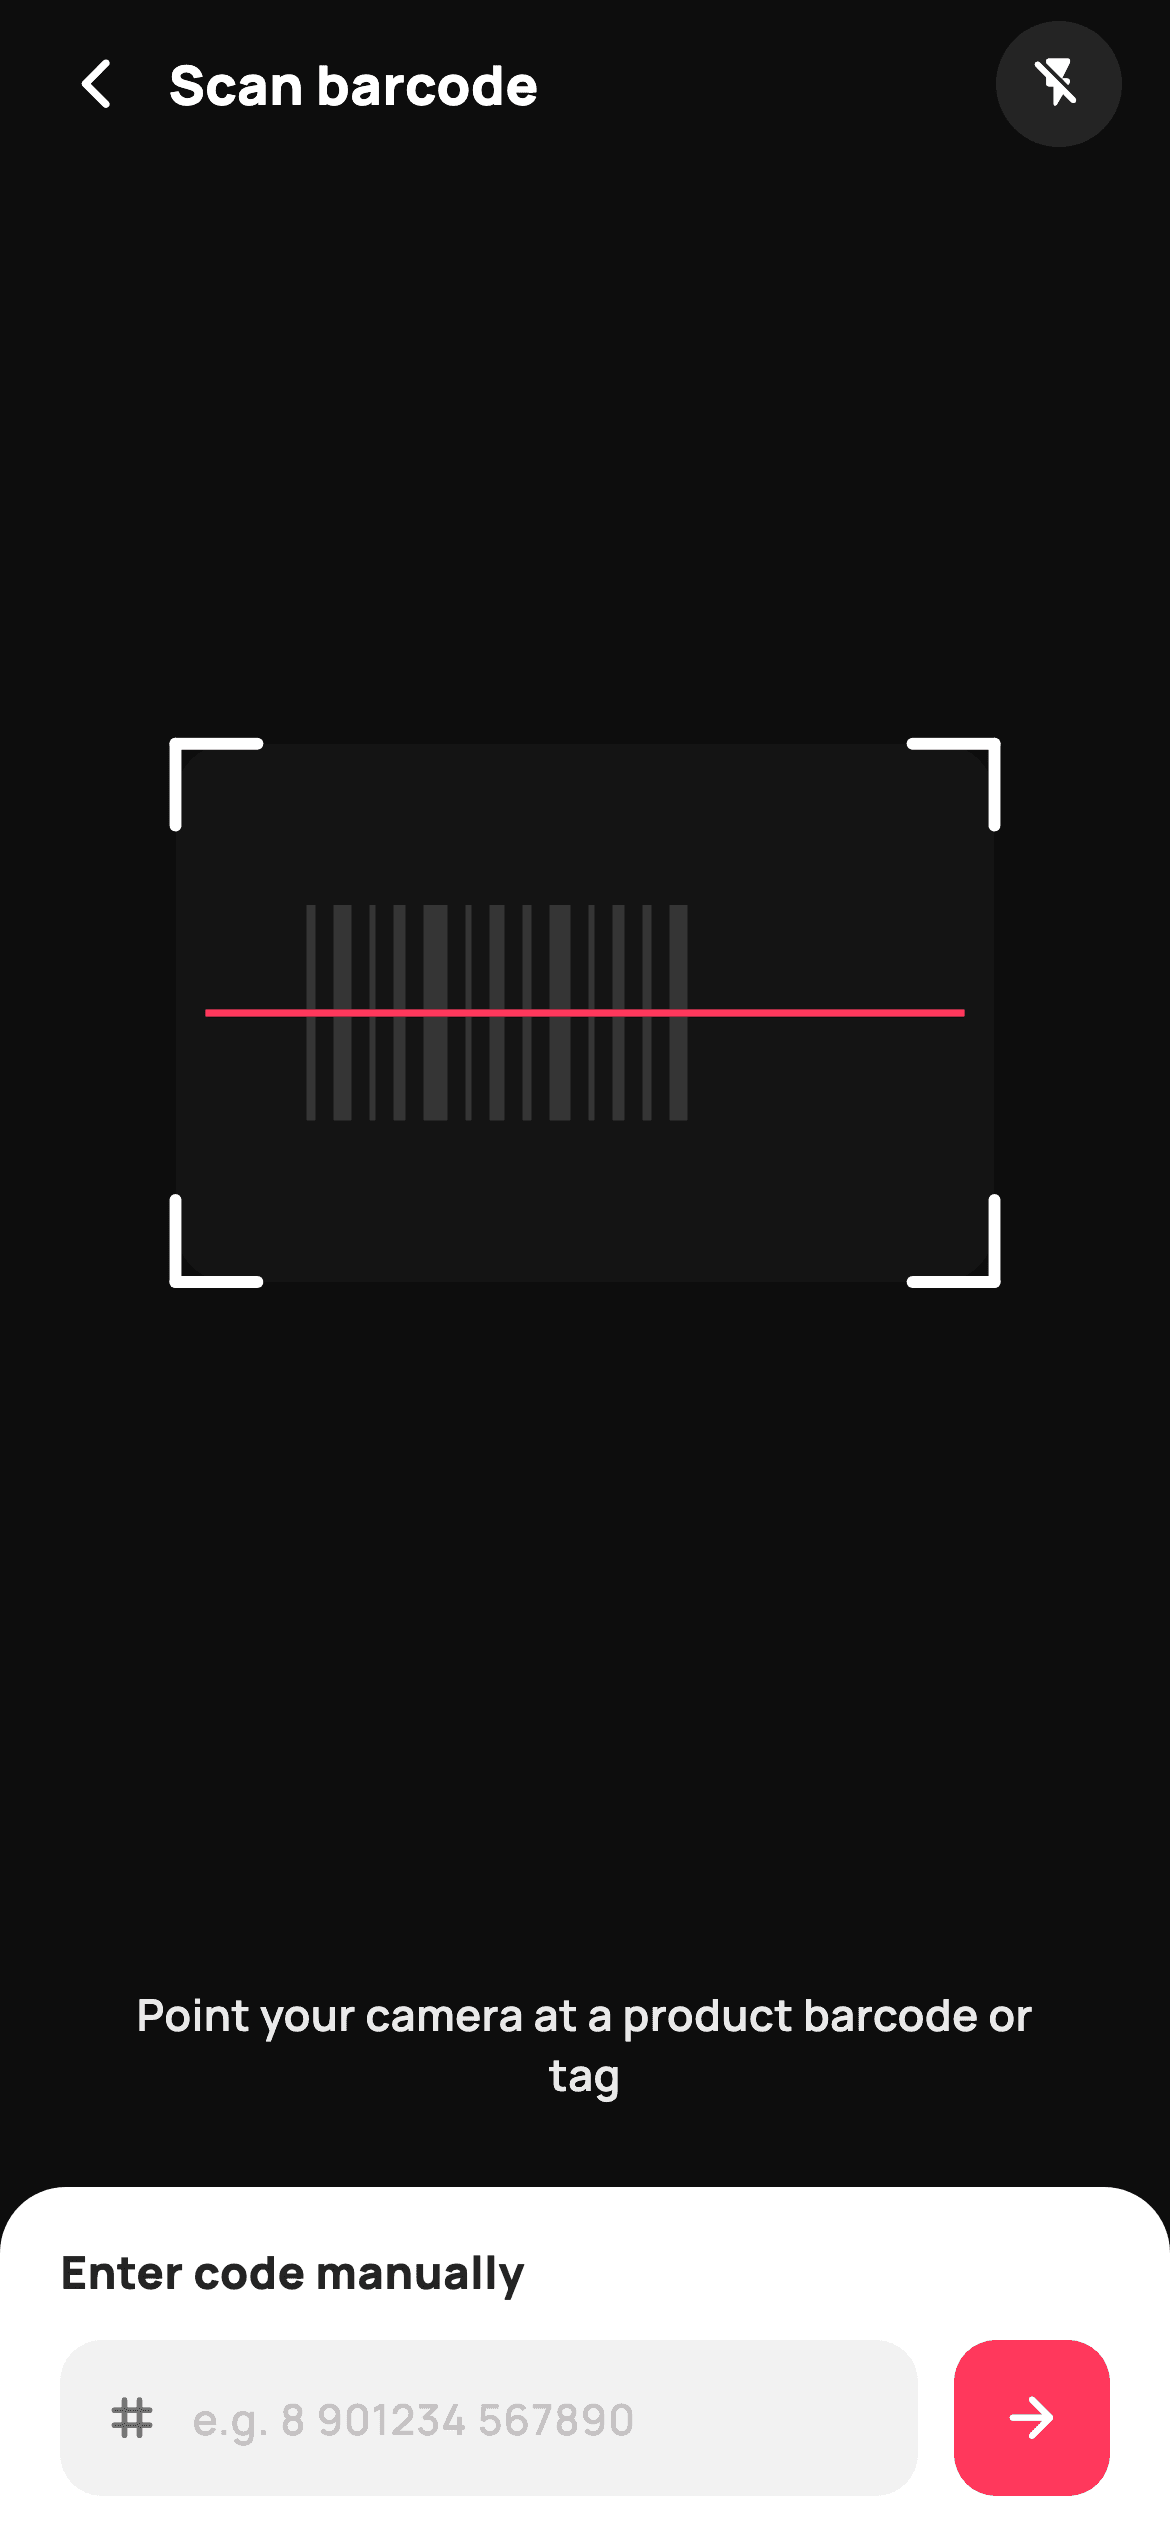
Shoppers standing in a store aisle want a price or a stock check without typing thirteen digits, and a scanner that offers no fallback strands anyone whose barcode is creased or badly lit. This tutorial builds StyleCart's scan screen in Flutter: a dark viewfinder whose scan window is painted with an even-odd dim mask, white corner brackets, a faint barcode hint and a red scan line, plus a torch toggle and a white sheet for typing the code by hand. The camera itself is not included; the screen paints the overlay and hands you callbacks.
Watch the Flutter UI walkthrough
A short screen recording of Scan Barcode running, if you'd rather see it before you read the code. The written tutorial below covers everything in it.
Can't see the video? Watch it on YouTube.
What you'll build
- ✓A full-bleed scan overlay whose cut-out window is punched with an even-odd Path instead of four dim rectangles
- ✓White corner brackets drawn as eight round-capped lines from a single two-line helper
- ✓A torch button that flips both the flash glyph and its own translucent circle in one setState
- ✓A rounded white manual-entry sheet with a numeric field that submits on the keyboard's action key or the arrow button
- ✓A faint painted barcode hint whose bar loop stops itself before it reaches the window edge
Step-by-step build
Create the file
Add a new file at lib/ecom_search_barcode/ecom_search_barcode_screen.dart in your Flutter project.
Register the bundled fonts
No external packages — this is pure Flutter. It does bundle its design font (Manrope), so drop the font file into fonts/ and declare it in pubspec.yaml:
flutter:
  fonts:
    - family: Manrope
      fonts:
- asset: fonts/Manrope-Regular.ttfBuild it, piece by piece
Here's how the screen goes together. Each block below is a real slice of the code with a plain-English explanation — paste them in order, or grab the whole file from the next section.
Callbacks out, palette in
import 'package:flutter/material.dart';

/// StyleCart — Scan Barcode.
///
/// A barcode scanner: a dark viewfinder with a painted scan window (corner
/// brackets, a red scan line and a faint barcode hint), a "point at a tag"
/// prompt, a torch toggle and a manual-entry fallback field.
///
/// Self-contained per CONVENTIONS.md: pure Flutter, bundled Manrope, inline
/// Airbnb-style tokens, own light theme + SafeArea. The scan window is a
/// CustomPainter (no emoji glyph). Exposes callbacks only.
class EcomSearchBarcodeScreen extends StatefulWidget {
  const EcomSearchBarcodeScreen({
    super.key,
    this.onBack,
    this.onTorch,
    this.onSubmitCode,
  });

  final VoidCallback? onBack;
  final VoidCallback? onTorch;

  /// A manually-typed code was submitted.
  final ValueChanged<String>? onSubmitCode;

  @override
  State<EcomSearchBarcodeScreen> createState() =>
      _EcomSearchBarcodeScreenState();
}

class _EcomSearchBarcodeScreenState extends State<EcomSearchBarcodeScreen> {
  static const String _font = 'Manrope';
  static const Color _ink = Color(0xFF222222);
  static const Color _muted = Color(0xFF6A6A6A);
  static const Color _faint = Color(0xFFC1C1C1);
  static const Color _brand = Color(0xFFFF385C);
  static const Color _surface = Color(0xFFF2F2F2);
  static const Color _viewfinder = Color(0xFF141414);

  final TextEditingController _ctl = TextEditingController();
  bool _torch = false;
`EcomSearchBarcodeScreen` is a `StatefulWidget` exposing only `onBack`, `onTorch` and `onSubmitCode` — a `ValueChanged<String>` so the parent receives the typed digits rather than the screen deciding what a code means. State exists for two reasons only: the `TextEditingController _ctl` and the `bool _torch` flag. The palette splits into a light half (`_ink` #222222, `_muted`, `_faint` #C1C1C1, `_surface` #F2F2F2) used inside the white sheet and a single dark token, `_viewfinder` #141414, for the camera area. `_brand` #FF385C serves twice — the scan line and the submit button — so the eye ties the two ends of the screen together.
A painted layer under a SafeArea column
  @override
  void dispose() {
    _ctl.dispose();
    super.dispose();
  }

  @override
  Widget build(BuildContext context) {
    return Theme(
      data: ThemeData.light(useMaterial3: true),
      child: Scaffold(
        backgroundColor: _viewfinder,
        body: Stack(
          children: <Widget>[
            const Positioned.fill(
              child: CustomPaint(painter: _BarcodeFramePainter()),
            ),
            SafeArea(
              child: Column(
                children: <Widget>[
                  _topBar(),
                  const Spacer(),
                  const Padding(
                    padding: EdgeInsets.symmetric(horizontal: 40),
                    child: Text(
                      'Point your camera at a product barcode or tag',
                      textAlign: TextAlign.center,
                      style: TextStyle(
                        fontFamily: _font,
                        fontSize: 14.5,
                        fontWeight: FontWeight.w600,
                        height: 1.4,
                        color: Color(0xFFEAEAEA),
                      ),
                    ),
                  ),
                  const SizedBox(height: 28),
                  _manualEntry(),
                ],
              ),
            ),
          ],
        ),
      ),
    );
  }
`dispose()` releases `_ctl` before calling `super.dispose()`, the one piece of housekeeping this screen owes. The body is a `Stack` whose first child is a `Positioned.fill` `CustomPaint` — the overlay must ignore safe-area insets and bleed under the status bar, which is exactly why it sits outside the `SafeArea` that wraps the interactive column. Inside, `_topBar()` then a single `Spacer()` push the prompt and the sheet to the bottom, leaving the painted window visible around the 40% mark. The prompt sits at 14.5px `w600` in #EAEAEA with `height: 1.4` and 40px horizontal padding, so it wraps to two centred lines instead of running edge to edge.
The header and its stateful torch
  Widget _topBar() {
    return Padding(
      padding: const EdgeInsets.fromLTRB(8, 4, 16, 4),
      child: Row(
        children: <Widget>[
          IconButton(
            onPressed: widget.onBack,
            icon: const Icon(Icons.arrow_back_ios_new_rounded,
                size: 20, color: Colors.white),
          ),
          const Expanded(
            child: Text(
              'Scan barcode',
              style: TextStyle(
                fontFamily: _font,
                fontSize: 18,
                fontWeight: FontWeight.w800,
                color: Colors.white,
              ),
            ),
          ),
          GestureDetector(
            onTap: () {
              setState(() => _torch = !_torch);
              widget.onTorch?.call();
            },
            child: Container(
              width: 42,
              height: 42,
              alignment: Alignment.center,
              decoration: BoxDecoration(
                color: _torch
                    ? Colors.white.withValues(alpha: 0.22)
                    : Colors.white.withValues(alpha: 0.10),
                shape: BoxShape.circle,
              ),
              child: Icon(
                _torch ? Icons.flash_on_rounded : Icons.flash_off_rounded,
                size: 20,
                color: Colors.white,
              ),
            ),
          ),
        ],
      ),
    );
  }
The row is asymmetric on purpose: `EdgeInsets.fromLTRB(8, 4, 16, 4)` gives the left only 8px because the `IconButton` already carries its own 48px touch padding, while the torch needs a real 16px from the right edge. The title is wrapped in `Expanded` so it takes all the slack and pins the torch to the far side without a `Spacer`. The toggle is a `GestureDetector` over a 42px circular `Container`, not an `IconButton`, because it needs a visible background: tapping runs `setState(() => _torch = !_torch)` and then `widget.onTorch?.call()`, so the highlight flips locally while the real flash stays the parent's job. On, the circle is `Colors.white.withValues(alpha: 0.22)` and the glyph becomes `flash_on_rounded`; off, it drops to alpha 0.10 with `flash_off_rounded` — two cues changing together so the state reads at a glance on a dark background.
The manual-entry sheet
  Widget _manualEntry() {
    return Container(
      decoration: const BoxDecoration(
        color: Colors.white,
        borderRadius: BorderRadius.vertical(top: Radius.circular(22)),
      ),
      child: SafeArea(
        top: false,
        child: Padding(
          padding: const EdgeInsets.fromLTRB(20, 18, 20, 12),
          child: Column(
            mainAxisSize: MainAxisSize.min,
            crossAxisAlignment: CrossAxisAlignment.start,
            children: <Widget>[
              const Text(
                'Enter code manually',
                style: TextStyle(
                  fontFamily: _font,
                  fontSize: 15,
                  fontWeight: FontWeight.w800,
                  color: _ink,
                ),
              ),
              const SizedBox(height: 12),
              Row(
                children: <Widget>[
                  Expanded(
                    child: Container(
                      height: 52,
                      padding: const EdgeInsets.symmetric(horizontal: 14),
                      decoration: BoxDecoration(
                        color: _surface,
                        borderRadius: BorderRadius.circular(14),
                      ),
                      child: Row(
                        children: <Widget>[
                          const Icon(Icons.tag_rounded,
                              size: 20, color: _muted),
                          const SizedBox(width: 10),
The fallback is a white `Container` with `BorderRadius.vertical(top: Radius.circular(22))` — rounded only at the top, so it reads as a sheet rising out of the viewfinder rather than a floating card. `SafeArea(top: false)` sits *inside* the container, which is what lets the white extend beneath the home indicator while the field and button stay above it. Padding of `fromLTRB(20, 18, 20, 12)` is tighter at the bottom because the SafeArea adds its own inset there. `mainAxisSize: MainAxisSize.min` keeps the column hugging its contents so the sheet is only as tall as the label plus the 52px input row. The field's shell is a 52px `_surface` container at radius 14 holding a `tag_rounded` icon in `_muted` — a chrome-free box instead of a bordered `TextField`.
Two ways to submit the same code
                          Expanded(
                            child: TextField(
                              controller: _ctl,
                              keyboardType: TextInputType.number,
                              cursorColor: _brand,
                              onSubmitted: widget.onSubmitCode,
                              style: const TextStyle(
                                fontFamily: _font,
                                fontSize: 15,
                                fontWeight: FontWeight.w700,
                                color: _ink,
                              ),
                              decoration: const InputDecoration(
                                isDense: true,
                                border: InputBorder.none,
                                hintText: 'e.g. 8 901234 567890',
                                hintStyle: TextStyle(
                                  fontFamily: _font,
                                  fontSize: 14,
                                  fontWeight: FontWeight.w500,
                                  color: _faint,
                                ),
                              ),
                            ),
                          ),
                        ],
                      ),
                    ),
                  ),
                  const SizedBox(width: 12),
                  SizedBox(
                    height: 52,
                    width: 52,
                    child: FilledButton(
                      onPressed: () => widget.onSubmitCode?.call(_ctl.text),
                      style: FilledButton.styleFrom(
                        backgroundColor: _brand,
                        shape: RoundedRectangleBorder(
                          borderRadius: BorderRadius.circular(14),
                        ),
                        padding: EdgeInsets.zero,
                      ),
                      child: const Icon(Icons.arrow_forward_rounded,
                          size: 22, color: Colors.white),
                    ),
                  ),
                ],
              ),
            ],
          ),
        ),
      ),
    );
  }
The `TextField` runs with `border: InputBorder.none` and `isDense: true` because the surrounding container already provides the shape and the 14px padding — leaving Material's default underline would draw a second box inside the first. `keyboardType: TextInputType.number` brings up the digit pad for an EAN, and the hint `'e.g. 8 901234 567890'` is spaced in EAN-13 groups so the format is obvious without a label. Submission is wired twice to the same callback but through different paths: `onSubmitted: widget.onSubmitCode` passes the field's own value on the keyboard action key, while the 52×52 `FilledButton` calls `widget.onSubmitCode?.call(_ctl.text)` and must read the controller itself. The button is square by construction — a `SizedBox` of 52 by 52 with `padding: EdgeInsets.zero`, since a FilledButton's default padding would otherwise fight the fixed size — and matches the field's radius 14 and height exactly.
Punching the window out of the dim
/// Paints the scan window: a dimmed surround, corner brackets, a red scan line
/// and a faint barcode hint inside the cut-out.
class _BarcodeFramePainter extends CustomPainter {
  const _BarcodeFramePainter();

  @override
  void paint(Canvas canvas, Size size) {
    const Color brand = Color(0xFFFF385C);
    final double w = size.width;
    final double h = size.height;
    final Rect win = Rect.fromCenter(
      center: Offset(w / 2, h * 0.40),
      width: w * 0.70,
      height: w * 0.46,
    );

    // Dim the area outside the scan window.
    final Path outside = Path()
      ..addRect(Offset.zero & size)
      ..addRRect(RRect.fromRectAndRadius(win, const Radius.circular(18)))
      ..fillType = PathFillType.evenOdd;
    canvas.drawPath(outside, Paint()..color = Colors.black.withValues(alpha: 0.35));

    // Faint barcode hint inside the window.
    final Paint bar = Paint()..color = Colors.white.withValues(alpha: 0.14);
    final List<double> widths = <double>[3, 6, 2, 4, 8, 2, 5, 3, 7, 2, 4, 3, 6];
    double x = win.left + win.width * 0.16;
    final double top = win.top + win.height * 0.30;
    final double bot = win.bottom - win.height * 0.30;
    for (final double bw in widths) {
      canvas.drawRect(Rect.fromLTRB(x, top, x + bw, bot), bar);
      x += bw + 6;
      if (x > win.right - win.width * 0.16) break;
    }
`_BarcodeFramePainter` centres the window at `h * 0.40` — above the middle, so it is not hidden behind the prompt and sheet — and sizes it from width alone: `w * 0.70` by `w * 0.46`, a landscape rectangle matching the shape of a real barcode. The dim is one `Path` that adds the full-size rect and then the rounded window, with `fillType = PathFillType.evenOdd`; the overlapping region cancels out, so a single `drawPath` at `Colors.black.withValues(alpha: 0.35)` darkens everything except the cut-out. Four separate rectangles would leave seams at the corners. The barcode hint loops a hand-picked list of 13 bar widths, advancing `x` by `bw + 6` each time and breaking once it passes 16% in from the right edge, which keeps the pattern irregular like a real code while guaranteeing it never spills out of the window.
Brackets, scan line, and no repaint
    // Corner brackets.
    final double len = w * 0.07;
    final Paint corner = Paint()
      ..style = PaintingStyle.stroke
      ..strokeWidth = 4
      ..strokeCap = StrokeCap.round
      ..color = Colors.white;
    void bracket(Offset o, double dx, double dy) {
      canvas.drawLine(o, o.translate(dx, 0), corner);
      canvas.drawLine(o, o.translate(0, dy), corner);
    }

    bracket(win.topLeft, len, len);
    bracket(win.topRight, -len, len);
    bracket(win.bottomLeft, len, -len);
    bracket(win.bottomRight, -len, -len);

    // Red scan line.
    final double scanY = win.center.dy;
    canvas.drawLine(
      Offset(win.left + 10, scanY),
      Offset(win.right - 10, scanY),
      Paint()
        ..strokeWidth = 2.4
        ..color = brand,
    );
  }

  @override
  bool shouldRepaint(_BarcodeFramePainter oldDelegate) => false;
}
The corners use a local closure, `bracket(Offset o, double dx, double dy)`, that draws one horizontal and one vertical line from the same origin; calling it four times with signs flipped per corner — `(len, len)` at top-left through `(-len, -len)` at bottom-right — produces all eight strokes without repeating the maths. Arm length is `w * 0.07`, so the brackets scale with the device rather than the window. `StrokeCap.round` at `strokeWidth: 4` softens the tips so they do not look clipped. The scan line is a single 2.4px brand-red `drawLine` across the window's vertical centre, inset 10px at each end so it stops short of the brackets. `shouldRepaint` returns `false`: nothing here depends on state, and the line is static — animating it is a change you make deliberately, not one the painter pays for on every frame.
Full code
The complete, ready-to-paste source. Free to use in your projects — one click copies it all.
import 'package:flutter/material.dart';

/// StyleCart — Scan Barcode.
///
/// A barcode scanner: a dark viewfinder with a painted scan window (corner
/// brackets, a red scan line and a faint barcode hint), a "point at a tag"
/// prompt, a torch toggle and a manual-entry fallback field.
///
/// Self-contained per CONVENTIONS.md: pure Flutter, bundled Manrope, inline
/// Airbnb-style tokens, own light theme + SafeArea. The scan window is a
/// CustomPainter (no emoji glyph). Exposes callbacks only.
class EcomSearchBarcodeScreen extends StatefulWidget {
  const EcomSearchBarcodeScreen({
    super.key,
    this.onBack,
    this.onTorch,
    this.onSubmitCode,
  });

  final VoidCallback? onBack;
  final VoidCallback? onTorch;

  /// A manually-typed code was submitted.
  final ValueChanged<String>? onSubmitCode;

  @override
  State<EcomSearchBarcodeScreen> createState() =>
      _EcomSearchBarcodeScreenState();
}

class _EcomSearchBarcodeScreenState extends State<EcomSearchBarcodeScreen> {
  static const String _font = 'Manrope';
  static const Color _ink = Color(0xFF222222);
  static const Color _muted = Color(0xFF6A6A6A);
  static const Color _faint = Color(0xFFC1C1C1);
  static const Color _brand = Color(0xFFFF385C);
  static const Color _surface = Color(0xFFF2F2F2);
  static const Color _viewfinder = Color(0xFF141414);

  final TextEditingController _ctl = TextEditingController();
  bool _torch = false;

  @override
  void dispose() {
    _ctl.dispose();
    super.dispose();
  }

  @override
  Widget build(BuildContext context) {
    return Theme(
      data: ThemeData.light(useMaterial3: true),
      child: Scaffold(
        backgroundColor: _viewfinder,
        body: Stack(
          children: <Widget>[
            const Positioned.fill(
              child: CustomPaint(painter: _BarcodeFramePainter()),
            ),
            SafeArea(
              child: Column(
                children: <Widget>[
                  _topBar(),
                  const Spacer(),
                  const Padding(
                    padding: EdgeInsets.symmetric(horizontal: 40),
                    child: Text(
                      'Point your camera at a product barcode or tag',
                      textAlign: TextAlign.center,
                      style: TextStyle(
                        fontFamily: _font,
                        fontSize: 14.5,
                        fontWeight: FontWeight.w600,
                        height: 1.4,
                        color: Color(0xFFEAEAEA),
                      ),
                    ),
                  ),
                  const SizedBox(height: 28),
                  _manualEntry(),
                ],
              ),
            ),
          ],
        ),
      ),
    );
  }

  Widget _topBar() {
    return Padding(
      padding: const EdgeInsets.fromLTRB(8, 4, 16, 4),
      child: Row(
        children: <Widget>[
          IconButton(
            onPressed: widget.onBack,
            icon: const Icon(Icons.arrow_back_ios_new_rounded,
                size: 20, color: Colors.white),
          ),
          const Expanded(
            child: Text(
              'Scan barcode',
              style: TextStyle(
                fontFamily: _font,
                fontSize: 18,
                fontWeight: FontWeight.w800,
                color: Colors.white,
              ),
            ),
          ),
          GestureDetector(
            onTap: () {
              setState(() => _torch = !_torch);
              widget.onTorch?.call();
            },
            child: Container(
              width: 42,
              height: 42,
              alignment: Alignment.center,
              decoration: BoxDecoration(
                color: _torch
                    ? Colors.white.withValues(alpha: 0.22)
                    : Colors.white.withValues(alpha: 0.10),
                shape: BoxShape.circle,
              ),
              child: Icon(
                _torch ? Icons.flash_on_rounded : Icons.flash_off_rounded,
                size: 20,
                color: Colors.white,
              ),
            ),
          ),
        ],
      ),
    );
  }

  Widget _manualEntry() {
    return Container(
      decoration: const BoxDecoration(
        color: Colors.white,
        borderRadius: BorderRadius.vertical(top: Radius.circular(22)),
      ),
      child: SafeArea(
        top: false,
        child: Padding(
          padding: const EdgeInsets.fromLTRB(20, 18, 20, 12),
          child: Column(
            mainAxisSize: MainAxisSize.min,
            crossAxisAlignment: CrossAxisAlignment.start,
            children: <Widget>[
              const Text(
                'Enter code manually',
                style: TextStyle(
                  fontFamily: _font,
                  fontSize: 15,
                  fontWeight: FontWeight.w800,
                  color: _ink,
                ),
              ),
              const SizedBox(height: 12),
              Row(
                children: <Widget>[
                  Expanded(
                    child: Container(
                      height: 52,
                      padding: const EdgeInsets.symmetric(horizontal: 14),
                      decoration: BoxDecoration(
                        color: _surface,
                        borderRadius: BorderRadius.circular(14),
                      ),
                      child: Row(
                        children: <Widget>[
                          const Icon(Icons.tag_rounded,
                              size: 20, color: _muted),
                          const SizedBox(width: 10),
                          Expanded(
                            child: TextField(
                              controller: _ctl,
                              keyboardType: TextInputType.number,
                              cursorColor: _brand,
                              onSubmitted: widget.onSubmitCode,
                              style: const TextStyle(
                                fontFamily: _font,
                                fontSize: 15,
                                fontWeight: FontWeight.w700,
                                color: _ink,
                              ),
                              decoration: const InputDecoration(
                                isDense: true,
                                border: InputBorder.none,
                                hintText: 'e.g. 8 901234 567890',
                                hintStyle: TextStyle(
                                  fontFamily: _font,
                                  fontSize: 14,
                                  fontWeight: FontWeight.w500,
                                  color: _faint,
                                ),
                              ),
                            ),
                          ),
                        ],
                      ),
                    ),
                  ),
                  const SizedBox(width: 12),
                  SizedBox(
                    height: 52,
                    width: 52,
                    child: FilledButton(
                      onPressed: () => widget.onSubmitCode?.call(_ctl.text),
                      style: FilledButton.styleFrom(
                        backgroundColor: _brand,
                        shape: RoundedRectangleBorder(
                          borderRadius: BorderRadius.circular(14),
                        ),
                        padding: EdgeInsets.zero,
                      ),
                      child: const Icon(Icons.arrow_forward_rounded,
                          size: 22, color: Colors.white),
                    ),
                  ),
                ],
              ),
            ],
          ),
        ),
      ),
    );
  }
}

/// Paints the scan window: a dimmed surround, corner brackets, a red scan line
/// and a faint barcode hint inside the cut-out.
class _BarcodeFramePainter extends CustomPainter {
  const _BarcodeFramePainter();

  @override
  void paint(Canvas canvas, Size size) {
    const Color brand = Color(0xFFFF385C);
    final double w = size.width;
    final double h = size.height;
    final Rect win = Rect.fromCenter(
      center: Offset(w / 2, h * 0.40),
      width: w * 0.70,
      height: w * 0.46,
    );

    // Dim the area outside the scan window.
    final Path outside = Path()
      ..addRect(Offset.zero & size)
      ..addRRect(RRect.fromRectAndRadius(win, const Radius.circular(18)))
      ..fillType = PathFillType.evenOdd;
    canvas.drawPath(outside, Paint()..color = Colors.black.withValues(alpha: 0.35));

    // Faint barcode hint inside the window.
    final Paint bar = Paint()..color = Colors.white.withValues(alpha: 0.14);
    final List<double> widths = <double>[3, 6, 2, 4, 8, 2, 5, 3, 7, 2, 4, 3, 6];
    double x = win.left + win.width * 0.16;
    final double top = win.top + win.height * 0.30;
    final double bot = win.bottom - win.height * 0.30;
    for (final double bw in widths) {
      canvas.drawRect(Rect.fromLTRB(x, top, x + bw, bot), bar);
      x += bw + 6;
      if (x > win.right - win.width * 0.16) break;
    }

    // Corner brackets.
    final double len = w * 0.07;
    final Paint corner = Paint()
      ..style = PaintingStyle.stroke
      ..strokeWidth = 4
      ..strokeCap = StrokeCap.round
      ..color = Colors.white;
    void bracket(Offset o, double dx, double dy) {
      canvas.drawLine(o, o.translate(dx, 0), corner);
      canvas.drawLine(o, o.translate(0, dy), corner);
    }

    bracket(win.topLeft, len, len);
    bracket(win.topRight, -len, len);
    bracket(win.bottomLeft, len, -len);
    bracket(win.bottomRight, -len, -len);

    // Red scan line.
    final double scanY = win.center.dy;
    canvas.drawLine(
      Offset(win.left + 10, scanY),
      Offset(win.right - 10, scanY),
      Paint()
        ..strokeWidth = 2.4
        ..color = brand,
    );
  }

  @override
  bool shouldRepaint(_BarcodeFramePainter oldDelegate) => false;
}
Plus bundled 5 binary assets (fonts/images). The CLI and MCP install those for you automatically.
Two faster ways to add it
Copy-paste works, but you can skip it entirely.
1. FlutterKit CLI
One command drops this screen — and its fonts — straight into your project.
$ flutterkit add ecom-search-barcode2. AI agent (MCP)
Connect FlutterKit's MCP server in Claude or Cursor and just ask your agent to install ecom-search-barcode — it fetches and writes the files for you.
FAQ
Does this screen actually scan a barcode?
No — the file imports only `package:flutter/material.dart`. It paints the viewfinder overlay, the window and the scan line, and hands you `onTorch` and `onSubmitCode`. It is the UI layer, so you can build and preview the whole thing before touching camera permissions.
How do I put a real camera behind the overlay?
Add a scanner package such as `mobile_scanner`, and replace the `Scaffold`'s dark `backgroundColor` with the camera preview as the Stack's bottom child — the `Positioned.fill` `CustomPaint` then draws straight on top of it. Feed the detected value into the same handler `onSubmitCode` uses, and route the torch button's `widget.onTorch` to the package's flash control instead of only flipping `_torch`.
Is this barcode scanner screen free to use commercially?
Yes — FlutterKit is free with nothing held back. Copy the screen and its painter from this page, install it with the CLI, or pull it through MCP and ship it in a retail or inventory app. No sign-up, no attribution, no paid tier.
What packages or fonts does it need?
No packages at all. The only font is Manrope, referenced as `fontFamily: 'Manrope'` — declare it in your `pubspec.yaml` assets, or delete the `_font` constant to fall back to the platform default. Every icon is a built-in Material rounded glyph, and the scan window is a `CustomPainter`, so there are no image assets either.
Which Flutter version does this need?
Flutter 3.22 or newer, because the torch highlight and the painter both use `Color.withValues(alpha: ...)` and the constructor uses `super.key`. On an older SDK swap those calls for `withOpacity(...)` and expand the constructor to the `{Key? key, ...}) : super(key: key)` form.


