How to Build a Flight Search Results Screen in Flutter (Full Code + Preview)
Flight results are a dense-information problem: six facts per row, and the user is scanning for two of them. This tutorial builds the Travel Kit's flights screen, which solves it by ranking type — a bold blue search card at the top summarising the query, then white result cards where departure/arrival times and the price are the only bold elements, with airline, duration and route compressed into one grey line. Airline marks are coloured initial avatars, so there are no logo assets to license or ship.
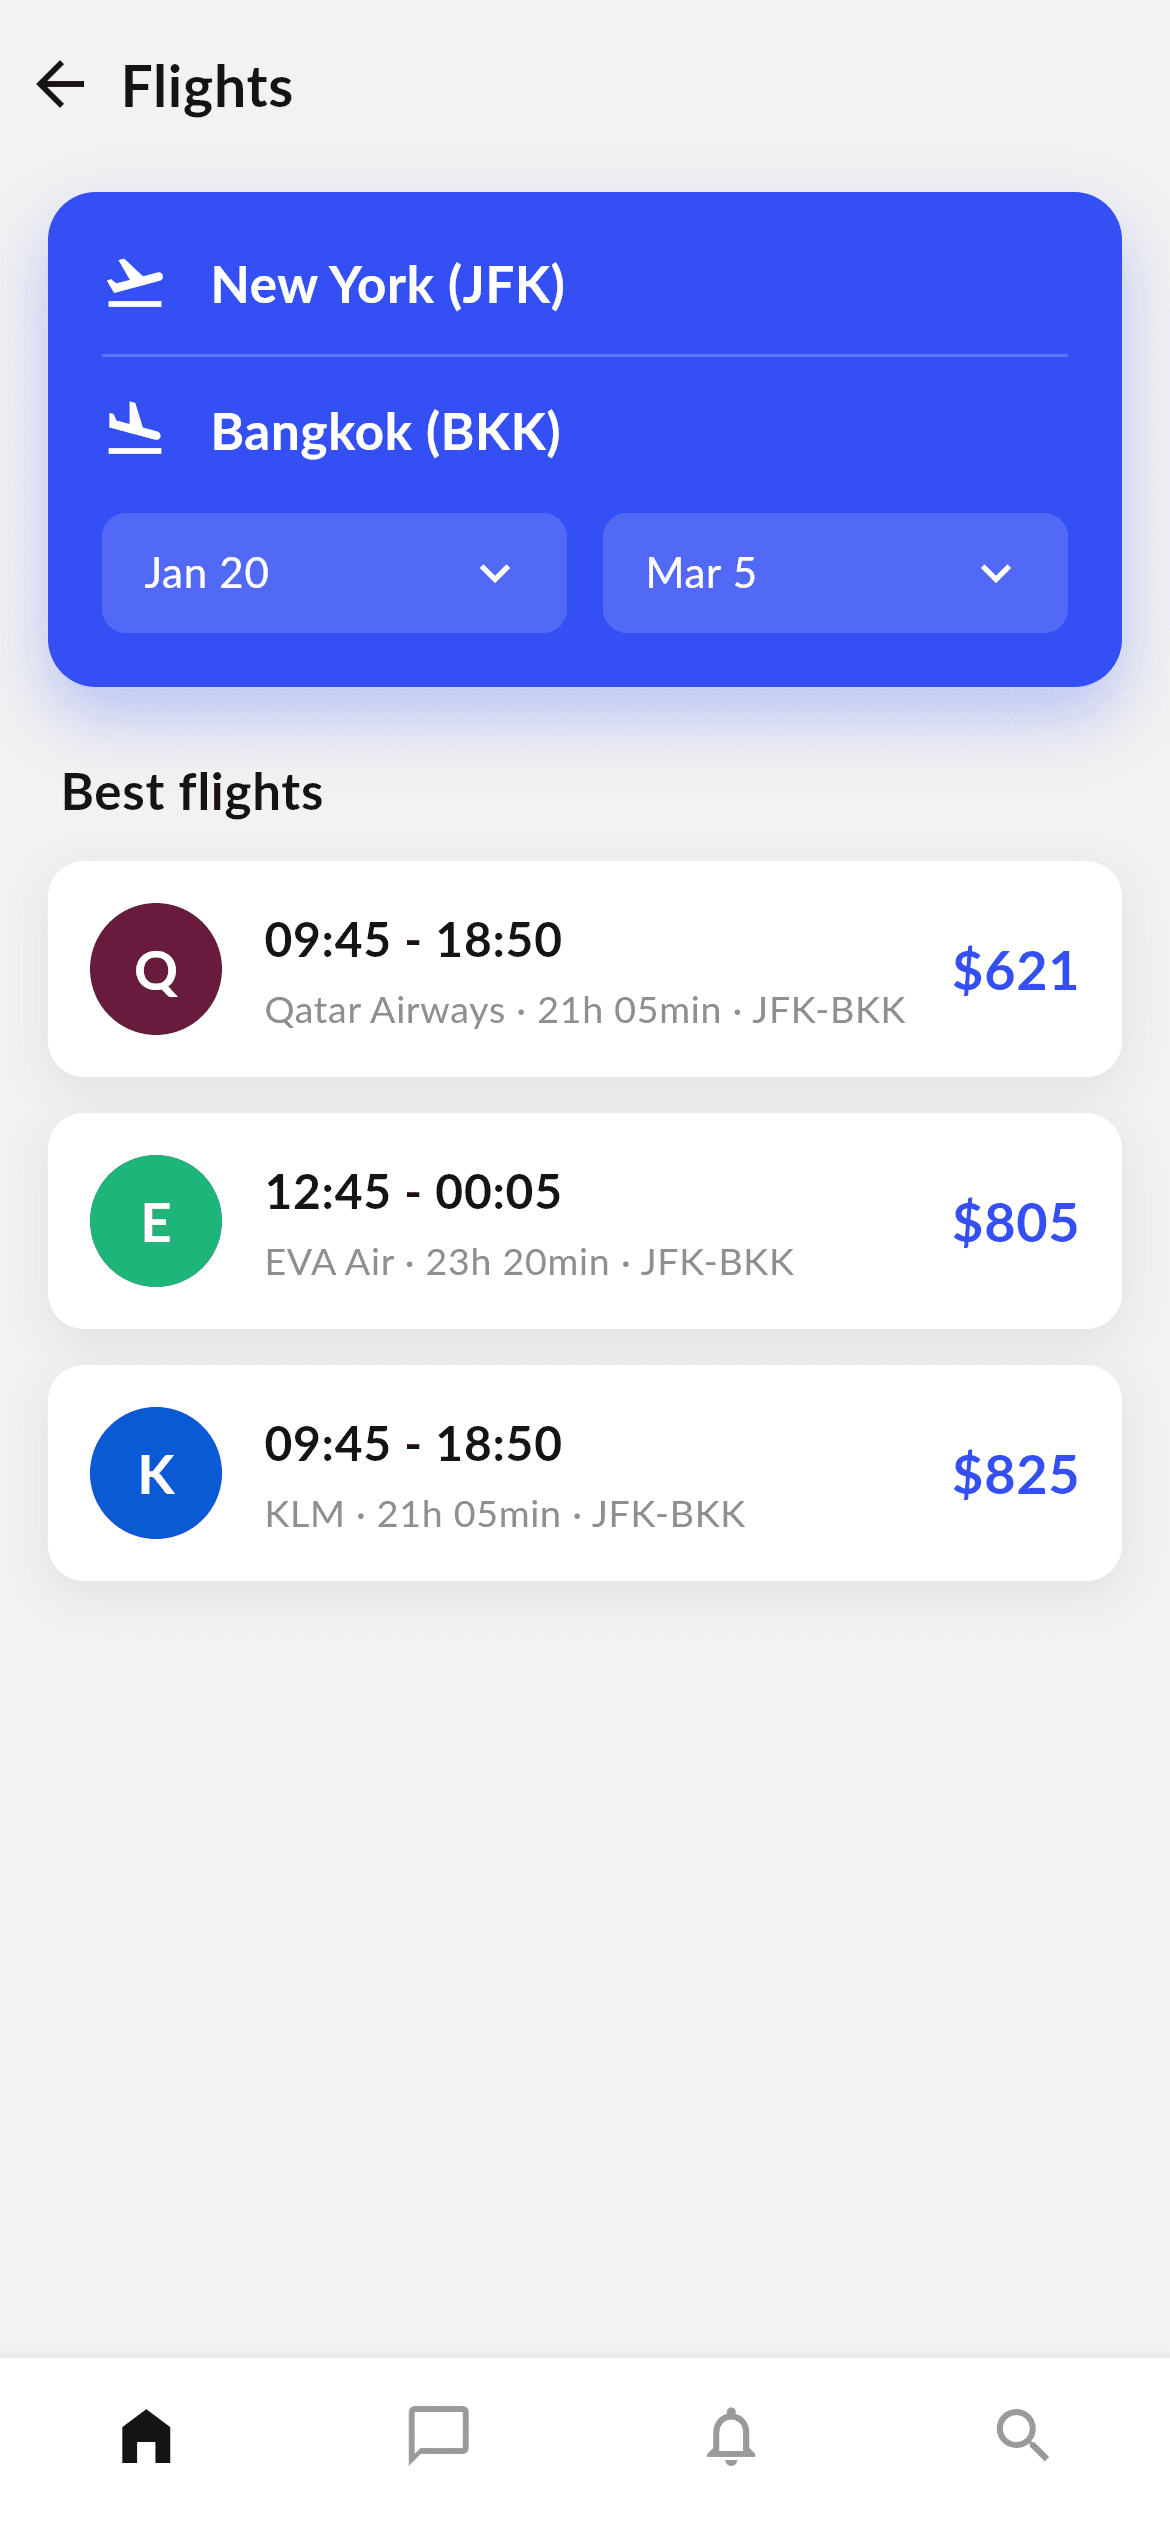
What you'll build
- ✓A blue search card with takeoff / landing rows split by a translucent divider and two date chips
- ✓Flight result cards where visual weight is spent only on time and price
- ✓Coloured initial avatars standing in for airline logos, with no image assets
- ✓A single interpolated line that compresses airline, duration and route separated by middle dots
- ✓A four-tab bottom nav and the bundled Lato font
Step-by-step build
Create the file
Add a new file at lib/travel_flights/travel_flights_screen.dart in your Flutter project.
Register the bundled fonts
No external packages — this is pure Flutter. It does bundle its design font (Lato), so drop the font file into fonts/ and declare it in pubspec.yaml:
flutter:
  fonts:
    - family: Lato
      fonts:
- asset: fonts/Lato-Regular.ttfBuild it, piece by piece
Here's how the screen goes together. Each block below is a real slice of the code with a plain-English explanation — paste them in order, or grab the whole file from the next section.
The flight data and the raw-string prices
import 'package:flutter/material.dart';

/// "Flights" screen from the Travel Kit: a light app bar, a blue search card
/// (from/to airports + travel dates), and a list of flight result cards
/// (airline, times, duration, route and price), plus the shared bottom
/// navigation bar.
///
/// Self-contained, pure Flutter. Bundles its design font (Lato); airline marks
/// are rendered as initial avatars (no bundled logos). Fully responsive — the
/// body scrolls, so nothing overflows. Renders standalone when pushed as a
/// route.
///
/// [onBack] is an optional callback for the back button; it defaults to a no-op
/// so the screen works on its own (the preview gallery wires it to pop).
class TravelFlightsScreen extends StatelessWidget {
  const TravelFlightsScreen({super.key, this.onBack});

  /// Invoked when the back button is tapped. No-op by default.
  final VoidCallback? onBack;

  static const Color _bg = Color(0xFFF2F2F2);
  static const Color _blue = Color(0xFF344FF4);
  static const Color _ink = Color(0xFF131314);
  static const Color _grey = Color(0xFF8F8F8F);
  static const Color _greyLow = Color(0xFF999999);
  static const String _font = 'Lato';

  static const List<_Flight> _flights = <_Flight>[
    _Flight('Qatar Airways', '09:45 - 18:50', '21h 05min', 'JFK-BKK', r'$621',
        Color(0xFF6A1B3D)),
    _Flight('EVA Air', '12:45 - 00:05', '23h 20min', 'JFK-BKK', r'$805',
        Color(0xFF1FB57A)),
    _Flight('KLM', '09:45 - 18:50', '21h 05min', 'JFK-BKK', r'$825',
        Color(0xFF0B5BD3)),
  ];
Only material.dart is imported. The screen is stateless with an optional onBack callback so it works standalone or inside a navigator. Six colour tokens are declared, including _blue (#344FF4) which is used for both the search card and the price. Then _flights: three _Flight records with positional fields — airline, times, duration, route, price and a brand colour. Look at the price literals: r'$621' uses a raw string, because in Dart a bare $ starts string interpolation. The r prefix is the cleanest way to keep a literal dollar sign without escaping it.
A custom app bar and the results list
  @override
  Widget build(BuildContext context) {
    return Scaffold(
      backgroundColor: _bg,
      body: SafeArea(
        bottom: false,
        child: Column(
          children: <Widget>[
            // Light top app bar.
            SizedBox(
              height: 56,
              child: Row(
                children: <Widget>[
                  IconButton(
                    onPressed: onBack ?? () {},
                    icon: const Icon(Icons.arrow_back, color: _ink),
                  ),
                  const Text(
                    'Flights',
                    style: TextStyle(
                      fontFamily: _font,
                      fontWeight: FontWeight.w700,
                      fontSize: 19,
                      color: _ink,
                    ),
                  ),
                ],
              ),
            ),
            Expanded(
              child: ListView(
                physics: const ClampingScrollPhysics(),
                padding: const EdgeInsets.fromLTRB(16, 8, 16, 20),
                children: <Widget>[
                  const _SearchCard(),
                  const Padding(
                    padding: EdgeInsets.fromLTRB(4, 22, 4, 12),
                    child: Text(
                      'Best flights',
                      style: TextStyle(
                        fontFamily: _font,
                        fontWeight: FontWeight.w700,
                        fontSize: 17,
                        color: _ink,
                      ),
                    ),
                  ),
                  for (final _Flight f in _flights) _FlightCard(flight: f),
                ],
              ),
            ),
          ],
        ),
      ),
      bottomNavigationBar: const _BottomNav(),
    );
  }
}
Instead of Scaffold's appBar, the screen builds a flat 56px SizedBox holding a back IconButton and the 'Flights' title — that avoids AppBar's default elevation and Material tint, which would fight the flat design. onPressed: onBack ?? () {} is the standard null-safe fallback for an optional callback. Below, a ListView holds the _SearchCard, a 'Best flights' section heading, and a collection-for loop emitting one _FlightCard per record. The list is padded 16px at the sides and 20px at the foot, and SafeArea is told bottom: false so Scaffold's own nav bar can claim the home-indicator inset instead.
The blue search card
/// Blue flight-search card: from/to airports and the travel dates.
class _SearchCard extends StatelessWidget {
  const _SearchCard();

  @override
  Widget build(BuildContext context) {
    return Container(
      padding: const EdgeInsets.all(18),
      decoration: BoxDecoration(
        color: TravelFlightsScreen._blue,
        borderRadius: BorderRadius.circular(16),
        boxShadow: <BoxShadow>[
          BoxShadow(
            color: TravelFlightsScreen._blue.withValues(alpha: 0.30),
            blurRadius: 18,
            offset: const Offset(0, 10),
          ),
        ],
      ),
      child: Column(
        children: <Widget>[
          const _AirportRow(icon: Icons.flight_takeoff, label: 'New York (JFK)'),
          const Padding(
            padding: EdgeInsets.symmetric(vertical: 12),
            child: Divider(color: Color(0x33FFFFFF), height: 1),
          ),
          const _AirportRow(icon: Icons.flight_land, label: 'Bangkok (BKK)'),
          const SizedBox(height: 16),
          Row(
            children: const <Widget>[
              Expanded(child: _DateChip(label: 'Jan 20')),
              SizedBox(width: 12),
              Expanded(child: _DateChip(label: 'Mar 5')),
            ],
          ),
        ],
      ),
    );
  }
}
The card is a Container filled with _blue at a 16px radius, casting a shadow of that same blue at 30% alpha — a tinted shadow that reads as a glow instead of a grey smudge. Inside, two _AirportRows are separated by a Divider coloured Color(0x33FFFFFF): white at 20% alpha, so the line sits on the blue without introducing another colour. The two date chips are Expanded siblings with a 12px gap, which makes them exactly equal width regardless of whether the label is 'Jan 20' or a longer date. The takeoff and landing icons carry the direction meaning so no 'From' and 'To' labels are needed.
Airport rows and date chips
class _AirportRow extends StatelessWidget {
  const _AirportRow({required this.icon, required this.label});

  final IconData icon;
  final String label;

  @override
  Widget build(BuildContext context) {
    return Row(
      children: <Widget>[
        Icon(icon, color: Colors.white, size: 22),
        const SizedBox(width: 14),
        Expanded(
          child: Text(
            label,
            maxLines: 1,
            overflow: TextOverflow.ellipsis,
            style: const TextStyle(
              fontFamily: TravelFlightsScreen._font,
              fontWeight: FontWeight.w700,
              fontSize: 17,
              color: Colors.white,
            ),
          ),
        ),
      ],
    );
  }
}

class _DateChip extends StatelessWidget {
  const _DateChip({required this.label});

  final String label;

  @override
  Widget build(BuildContext context) {
    return Container(
      padding: const EdgeInsets.symmetric(horizontal: 14, vertical: 10),
      decoration: BoxDecoration(
        color: const Color(0x26FFFFFF),
        borderRadius: BorderRadius.circular(8),
      ),
      child: Row(
        children: <Widget>[
          Expanded(
            child: Text(
              label,
              style: const TextStyle(
                fontFamily: TravelFlightsScreen._font,
                fontSize: 14,
                color: Colors.white,
              ),
            ),
          ),
          const Icon(Icons.keyboard_arrow_down, color: Colors.white, size: 20),
        ],
      ),
    );
  }
}
_AirportRow is an icon, a 14px gap and the airport name in an Expanded with maxLines: 1 and ellipsis — the ellipsis matters because airport names like 'Kuala Lumpur International (KUL)' are long and would otherwise overflow. _DateChip fills with Color(0x26FFFFFF), white at 15% alpha, so the chip reads as a recessed panel on the blue card rather than a separate surface. Its label sits in an Expanded with a trailing keyboard_arrow_down, the universal 'this opens a picker' cue; point it at showDatePicker when you wire it up.
The flight result card
/// A single flight result card: airline avatar, times, duration/route, price.
class _FlightCard extends StatelessWidget {
  const _FlightCard({required this.flight});

  final _Flight flight;

  @override
  Widget build(BuildContext context) {
    return Container(
      margin: const EdgeInsets.only(bottom: 12),
      padding: const EdgeInsets.all(14),
      decoration: BoxDecoration(
        color: Colors.white,
        borderRadius: BorderRadius.circular(12),
        boxShadow: const <BoxShadow>[
          BoxShadow(
            color: Color(0x14000000),
            blurRadius: 12,
            offset: Offset(0, 4),
          ),
        ],
      ),
      child: Row(
        children: <Widget>[
          Container(
            width: 44,
            height: 44,
            alignment: Alignment.center,
            decoration: BoxDecoration(
              color: flight.color,
              shape: BoxShape.circle,
            ),
            child: Text(
              flight.airline.characters.first,
              style: const TextStyle(
                fontFamily: TravelFlightsScreen._font,
                fontWeight: FontWeight.w700,
                fontSize: 18,
                color: Colors.white,
              ),
            ),
          ),
          const SizedBox(width: 14),
          Expanded(
            child: Column(
              crossAxisAlignment: CrossAxisAlignment.start,
              children: <Widget>[
                Text(
                  flight.time,
                  style: const TextStyle(
                    fontFamily: TravelFlightsScreen._font,
                    fontWeight: FontWeight.w700,
                    fontSize: 16,
                    color: TravelFlightsScreen._ink,
                  ),
                ),
                const SizedBox(height: 3),
                Text(
                  '${flight.airline} · ${flight.duration} · ${flight.route}',
                  maxLines: 1,
                  overflow: TextOverflow.ellipsis,
                  style: const TextStyle(
                    fontFamily: TravelFlightsScreen._font,
                    fontSize: 12.5,
                    color: TravelFlightsScreen._grey,
                  ),
                ),
              ],
            ),
          ),
          const SizedBox(width: 10),
          Text(
            flight.price,
            style: const TextStyle(
              fontFamily: TravelFlightsScreen._font,
              fontWeight: FontWeight.w700,
              fontSize: 18,
              color: TravelFlightsScreen._blue,
            ),
          ),
        ],
      ),
    );
  }
}
Each result is a white Container with a 12px radius and a very light Color(0x14000000) shadow — black at 8% alpha, blurred 12px — which separates it from the #F2F2F2 page without looking heavy. The airline mark is a 44px circle in the airline's brand colour holding flight.airline.characters.first; using .characters rather than [0] means the initial is a full grapheme, safe for any script. The middle Expanded stacks the times at 16px bold and then one interpolated line, '${flight.airline} · ${flight.duration} · ${flight.route}', at 12.5px grey with ellipsis — collapsing three facts into a single quiet line is what stops the card feeling like a table. The price closes the row at 18px bold in _blue, the only other colour on the card.
Full code
The complete, ready-to-paste source. Free to use in your projects — one click copies it all.
import 'package:flutter/material.dart';

/// "Flights" screen from the Travel Kit: a light app bar, a blue search card
/// (from/to airports + travel dates), and a list of flight result cards
/// (airline, times, duration, route and price), plus the shared bottom
/// navigation bar.
///
/// Self-contained, pure Flutter. Bundles its design font (Lato); airline marks
/// are rendered as initial avatars (no bundled logos). Fully responsive — the
/// body scrolls, so nothing overflows. Renders standalone when pushed as a
/// route.
///
/// [onBack] is an optional callback for the back button; it defaults to a no-op
/// so the screen works on its own (the preview gallery wires it to pop).
class TravelFlightsScreen extends StatelessWidget {
  const TravelFlightsScreen({super.key, this.onBack});

  /// Invoked when the back button is tapped. No-op by default.
  final VoidCallback? onBack;

  static const Color _bg = Color(0xFFF2F2F2);
  static const Color _blue = Color(0xFF344FF4);
  static const Color _ink = Color(0xFF131314);
  static const Color _grey = Color(0xFF8F8F8F);
  static const Color _greyLow = Color(0xFF999999);
  static const String _font = 'Lato';

  static const List<_Flight> _flights = <_Flight>[
    _Flight('Qatar Airways', '09:45 - 18:50', '21h 05min', 'JFK-BKK', r'$621',
        Color(0xFF6A1B3D)),
    _Flight('EVA Air', '12:45 - 00:05', '23h 20min', 'JFK-BKK', r'$805',
        Color(0xFF1FB57A)),
    _Flight('KLM', '09:45 - 18:50', '21h 05min', 'JFK-BKK', r'$825',
        Color(0xFF0B5BD3)),
  ];

  @override
  Widget build(BuildContext context) {
    return Scaffold(
      backgroundColor: _bg,
      body: SafeArea(
        bottom: false,
        child: Column(
          children: <Widget>[
            // Light top app bar.
            SizedBox(
              height: 56,
              child: Row(
                children: <Widget>[
                  IconButton(
                    onPressed: onBack ?? () {},
                    icon: const Icon(Icons.arrow_back, color: _ink),
                  ),
                  const Text(
                    'Flights',
                    style: TextStyle(
                      fontFamily: _font,
                      fontWeight: FontWeight.w700,
                      fontSize: 19,
                      color: _ink,
                    ),
                  ),
                ],
              ),
            ),
            Expanded(
              child: ListView(
                physics: const ClampingScrollPhysics(),
                padding: const EdgeInsets.fromLTRB(16, 8, 16, 20),
                children: <Widget>[
                  const _SearchCard(),
                  const Padding(
                    padding: EdgeInsets.fromLTRB(4, 22, 4, 12),
                    child: Text(
                      'Best flights',
                      style: TextStyle(
                        fontFamily: _font,
                        fontWeight: FontWeight.w700,
                        fontSize: 17,
                        color: _ink,
                      ),
                    ),
                  ),
                  for (final _Flight f in _flights) _FlightCard(flight: f),
                ],
              ),
            ),
          ],
        ),
      ),
      bottomNavigationBar: const _BottomNav(),
    );
  }
}

class _Flight {
  const _Flight(
    this.airline,
    this.time,
    this.duration,
    this.route,
    this.price,
    this.color,
  );

  final String airline;
  final String time;
  final String duration;
  final String route;
  final String price;
  final Color color;
}

/// Blue flight-search card: from/to airports and the travel dates.
class _SearchCard extends StatelessWidget {
  const _SearchCard();

  @override
  Widget build(BuildContext context) {
    return Container(
      padding: const EdgeInsets.all(18),
      decoration: BoxDecoration(
        color: TravelFlightsScreen._blue,
        borderRadius: BorderRadius.circular(16),
        boxShadow: <BoxShadow>[
          BoxShadow(
            color: TravelFlightsScreen._blue.withValues(alpha: 0.30),
            blurRadius: 18,
            offset: const Offset(0, 10),
          ),
        ],
      ),
      child: Column(
        children: <Widget>[
          const _AirportRow(icon: Icons.flight_takeoff, label: 'New York (JFK)'),
          const Padding(
            padding: EdgeInsets.symmetric(vertical: 12),
            child: Divider(color: Color(0x33FFFFFF), height: 1),
          ),
          const _AirportRow(icon: Icons.flight_land, label: 'Bangkok (BKK)'),
          const SizedBox(height: 16),
          Row(
            children: const <Widget>[
              Expanded(child: _DateChip(label: 'Jan 20')),
              SizedBox(width: 12),
              Expanded(child: _DateChip(label: 'Mar 5')),
            ],
          ),
        ],
      ),
    );
  }
}

class _AirportRow extends StatelessWidget {
  const _AirportRow({required this.icon, required this.label});

  final IconData icon;
  final String label;

  @override
  Widget build(BuildContext context) {
    return Row(
      children: <Widget>[
        Icon(icon, color: Colors.white, size: 22),
        const SizedBox(width: 14),
        Expanded(
          child: Text(
            label,
            maxLines: 1,
            overflow: TextOverflow.ellipsis,
            style: const TextStyle(
              fontFamily: TravelFlightsScreen._font,
              fontWeight: FontWeight.w700,
              fontSize: 17,
              color: Colors.white,
            ),
          ),
        ),
      ],
    );
  }
}

class _DateChip extends StatelessWidget {
  const _DateChip({required this.label});

  final String label;

  @override
  Widget build(BuildContext context) {
    return Container(
      padding: const EdgeInsets.symmetric(horizontal: 14, vertical: 10),
      decoration: BoxDecoration(
        color: const Color(0x26FFFFFF),
        borderRadius: BorderRadius.circular(8),
      ),
      child: Row(
        children: <Widget>[
          Expanded(
            child: Text(
              label,
              style: const TextStyle(
                fontFamily: TravelFlightsScreen._font,
                fontSize: 14,
                color: Colors.white,
              ),
            ),
          ),
          const Icon(Icons.keyboard_arrow_down, color: Colors.white, size: 20),
        ],
      ),
    );
  }
}

/// A single flight result card: airline avatar, times, duration/route, price.
class _FlightCard extends StatelessWidget {
  const _FlightCard({required this.flight});

  final _Flight flight;

  @override
  Widget build(BuildContext context) {
    return Container(
      margin: const EdgeInsets.only(bottom: 12),
      padding: const EdgeInsets.all(14),
      decoration: BoxDecoration(
        color: Colors.white,
        borderRadius: BorderRadius.circular(12),
        boxShadow: const <BoxShadow>[
          BoxShadow(
            color: Color(0x14000000),
            blurRadius: 12,
            offset: Offset(0, 4),
          ),
        ],
      ),
      child: Row(
        children: <Widget>[
          Container(
            width: 44,
            height: 44,
            alignment: Alignment.center,
            decoration: BoxDecoration(
              color: flight.color,
              shape: BoxShape.circle,
            ),
            child: Text(
              flight.airline.characters.first,
              style: const TextStyle(
                fontFamily: TravelFlightsScreen._font,
                fontWeight: FontWeight.w700,
                fontSize: 18,
                color: Colors.white,
              ),
            ),
          ),
          const SizedBox(width: 14),
          Expanded(
            child: Column(
              crossAxisAlignment: CrossAxisAlignment.start,
              children: <Widget>[
                Text(
                  flight.time,
                  style: const TextStyle(
                    fontFamily: TravelFlightsScreen._font,
                    fontWeight: FontWeight.w700,
                    fontSize: 16,
                    color: TravelFlightsScreen._ink,
                  ),
                ),
                const SizedBox(height: 3),
                Text(
                  '${flight.airline} · ${flight.duration} · ${flight.route}',
                  maxLines: 1,
                  overflow: TextOverflow.ellipsis,
                  style: const TextStyle(
                    fontFamily: TravelFlightsScreen._font,
                    fontSize: 12.5,
                    color: TravelFlightsScreen._grey,
                  ),
                ),
              ],
            ),
          ),
          const SizedBox(width: 10),
          Text(
            flight.price,
            style: const TextStyle(
              fontFamily: TravelFlightsScreen._font,
              fontWeight: FontWeight.w700,
              fontSize: 18,
              color: TravelFlightsScreen._blue,
            ),
          ),
        ],
      ),
    );
  }
}

/// Bottom navigation bar shared by the travel tab screens.
class _BottomNav extends StatelessWidget {
  const _BottomNav();

  @override
  Widget build(BuildContext context) {
    return BottomNavigationBar(
      currentIndex: 0,
      type: BottomNavigationBarType.fixed,
      backgroundColor: Colors.white,
      selectedItemColor: TravelFlightsScreen._ink,
      unselectedItemColor: TravelFlightsScreen._greyLow,
      showSelectedLabels: false,
      showUnselectedLabels: false,
      elevation: 8,
      items: const <BottomNavigationBarItem>[
        BottomNavigationBarItem(icon: Icon(Icons.home_filled), label: 'Home'),
        BottomNavigationBarItem(
            icon: Icon(Icons.chat_bubble_outline), label: 'Message'),
        BottomNavigationBarItem(
            icon: Icon(Icons.notifications_none), label: 'Notification'),
        BottomNavigationBarItem(icon: Icon(Icons.search), label: 'Search'),
      ],
    );
  }
}
Plus bundled 2 binary assets (fonts/images). The CLI and MCP install those for you automatically.
Two faster ways to add it
Copy-paste works, but you can skip it entirely.
1. FlutterKit CLI
One command drops this screen — and its fonts — straight into your project.
$ flutterkit add travel-flights2. AI agent (MCP)
Connect FlutterKit's MCP server in Claude or Cursor and just ask your agent to install travel-flights — it fetches and writes the files for you.
FAQ
Is this Flutter flight results screen free to use?
Yes. The full Dart source on this page is free for personal and commercial projects. Copy it here, install it with the FlutterKit CLI (flutterkit add travel-flights), or have an AI agent add it via MCP.
How do I plug in a real flight API?
Map your API response onto the _Flight class — it already holds the six fields a result row needs — and replace the const _flights list with a FutureBuilder or StreamBuilder. _FlightCard takes a _Flight and reads nothing else, so the card layout needs no changes.
Does it need any external packages or airline logos?
Neither. It's pure Flutter on the material library, and airline marks are coloured initial avatars, so there are no logo images to license or bundle. The only asset is the Lato font, registered in pubspec.yaml as shown in step 2.
Which Flutter version does it target?
It uses Color.withValues() for the search card's shadow, so it targets Flutter 3.22+ (Dart 3). On an older SDK, swap withValues(alpha: 0.30) for withOpacity(0.30) — the other translucent colours are already baked-in alpha hex values and need no change.

