How to Build a Doctor Appointments Screen in Flutter (Full Code + Preview)
Health apps live or die on their appointments screen — it's where a patient checks who they're seeing, when, and whether a visit is upcoming or done. This tutorial builds exactly that in Flutter: a bold 'My Appointment' header, an Active / History tab switcher, and a scrollable list of blue appointment cards showing the doctor's avatar, name, specialty, status, and schedule, all above a five-icon bottom navigation bar. You'll learn how to hold tab state, swap between two data lists, and lay it all out. It's pure Flutter with one bundled font.
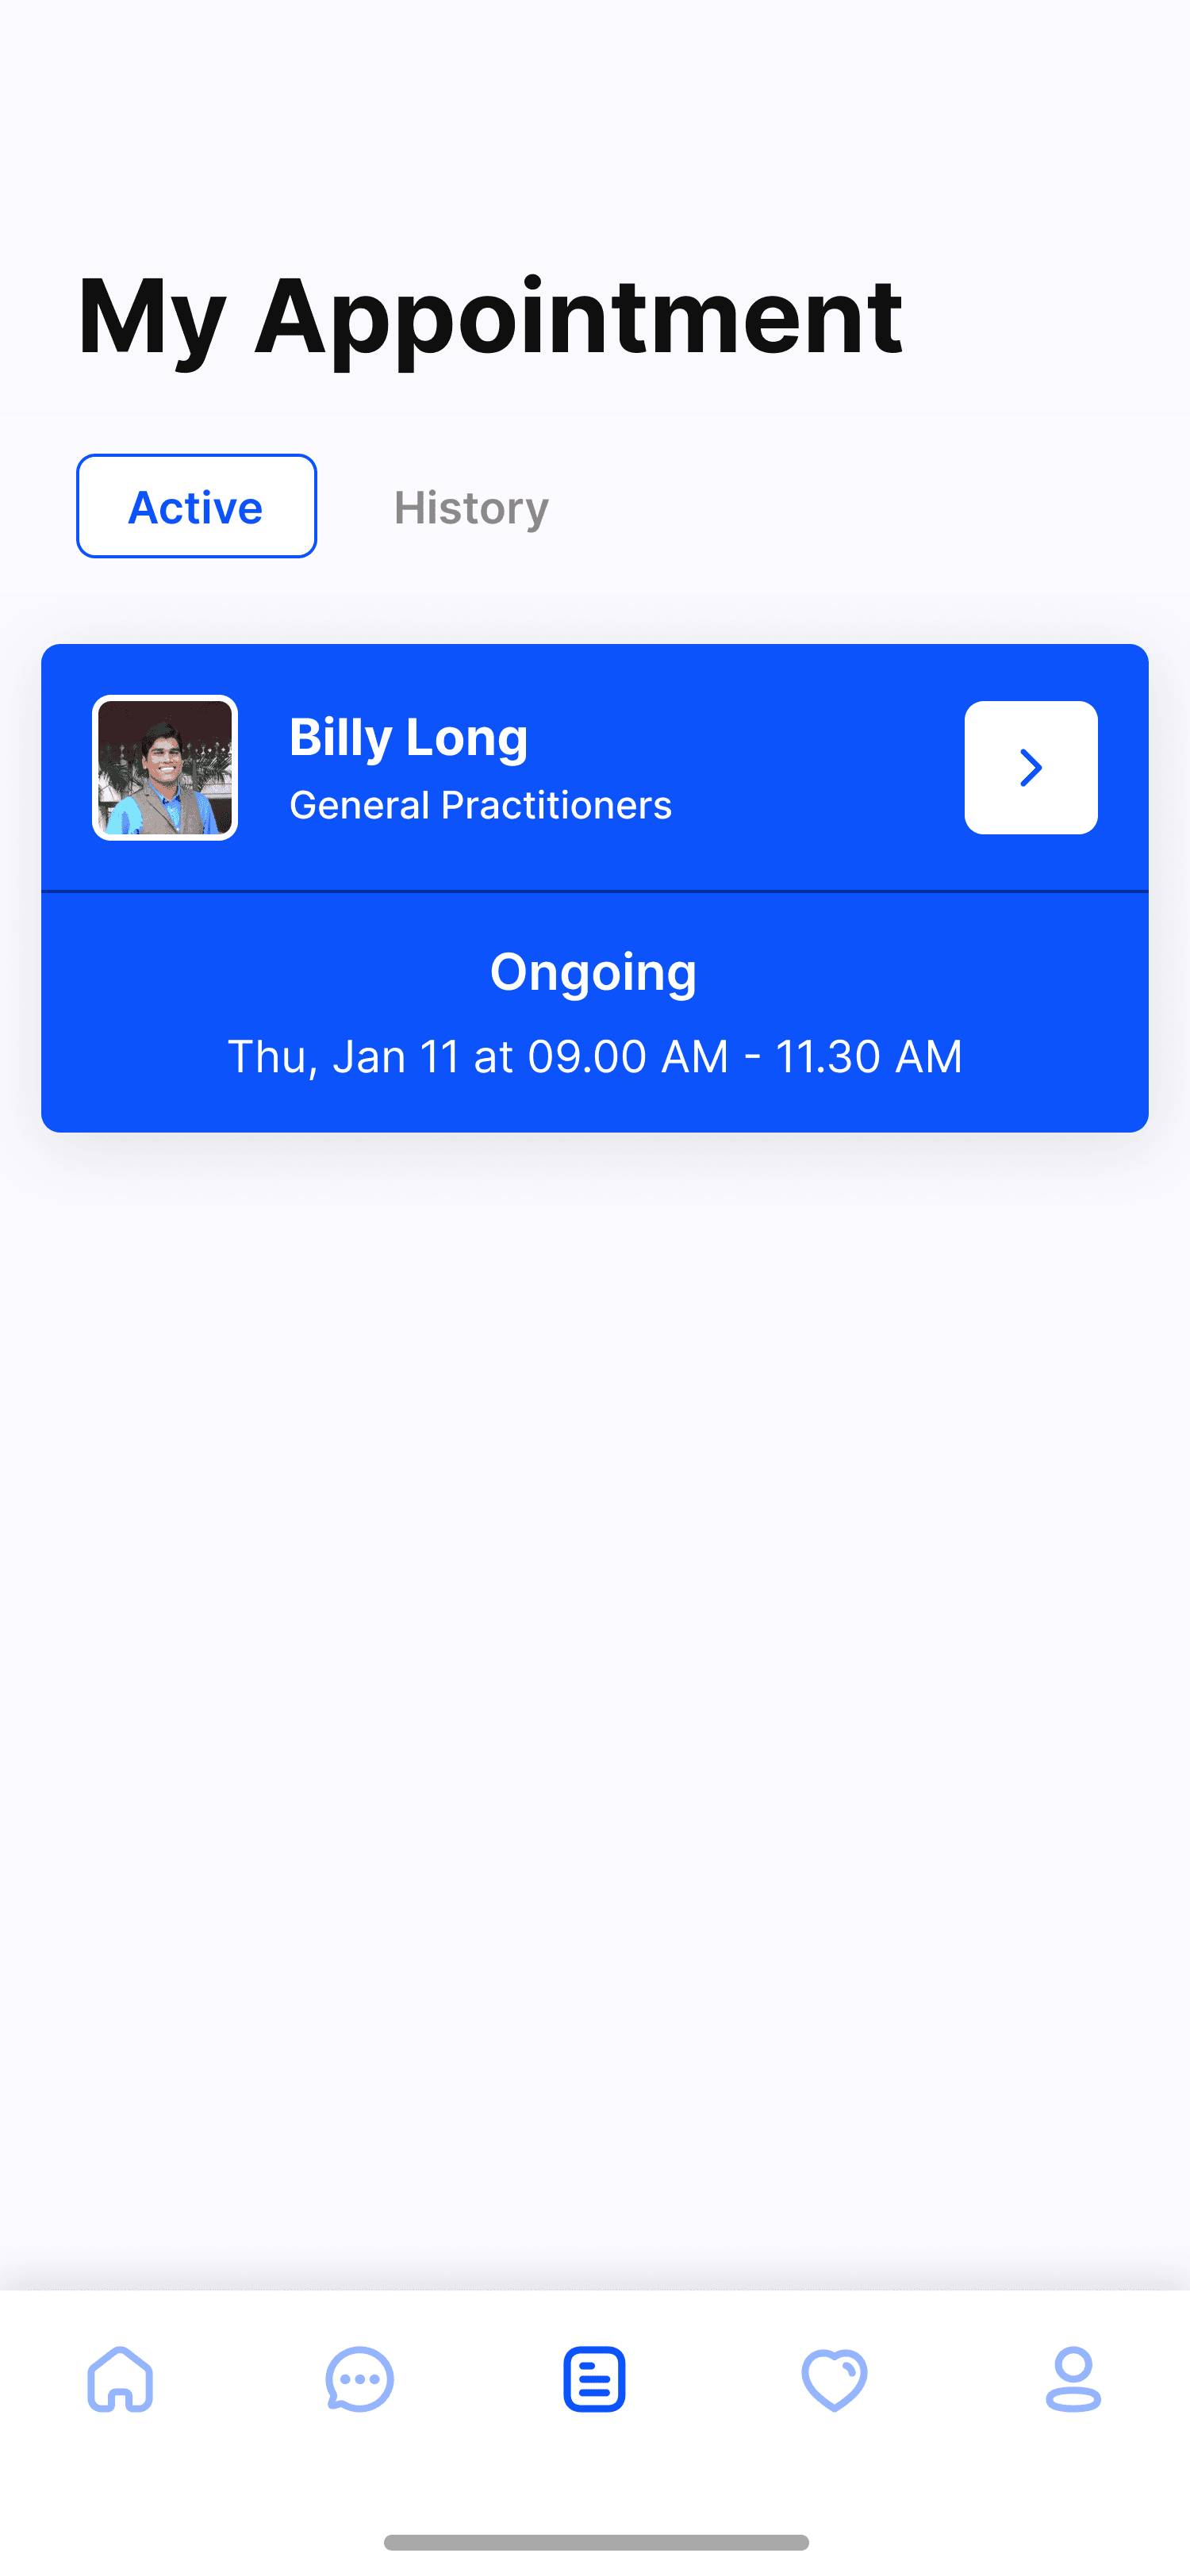
What you'll build
- ✓A stateful appointments screen that flips between Active and History lists with a tap
- ✓A large 'My Appointment' header in 32px bold Inter over a near-white canvas
- ✓A scrollable ListView of blue cards showing avatar, doctor name, specialty, status, and date/time
- ✓An Active / History pill tab switcher and a five-icon bottom navigation bar
- ✓Realistic demo data using network avatars (Pravatar), so there are no image assets to bundle
Step-by-step build
Create the file
Add a new file at lib/my_appointments/my_appointments_screen.dart in your Flutter project.
Register the bundled fonts
No external packages — this is pure Flutter. It does bundle its design font (Inter), so drop the font file into fonts/ and declare it in pubspec.yaml:
flutter:
  fonts:
    - family: Inter
      fonts:
- asset: fonts/Inter-Regular.ttfBuild it, piece by piece
Here's how the screen goes together. Each block below is a real slice of the code with a plain-English explanation — paste them in order, or grab the whole file from the next section.
Imports and the stateful screen shell
import 'package:flutter/material.dart';

import 'widgets/appointment_card.dart';
import 'widgets/bottom_nav_bar.dart';
import 'widgets/segmented_tabs.dart';

/// "My Appointments" — a medical appointments screen (Active / History).
///
/// Self-contained, pure Flutter, no external packages. Renders standalone when
/// pushed as a route — it carries its own colors and type, and does not depend
/// on any app-level theme.
///
/// Bundles its exact design font (Inter) per CONVENTIONS rule 5, and uses
/// network avatars (Pravatar) so it needs zero image-asset setup.
class MyAppointmentsScreen extends StatefulWidget {
  const MyAppointmentsScreen({super.key});

  @override
  State<MyAppointmentsScreen> createState() => _MyAppointmentsScreenState();
}
The file imports Flutter's material library and three local widgets it splits the UI into — AppointmentCard, AppointmentsBottomNav, and SegmentedTabs — so this screen file stays about layout, not the internals of each part. MyAppointmentsScreen is a StatefulWidget because the visible content changes: the user can switch tabs and the selected bottom-nav icon can move, so the widget needs mutable state. The const constructor takes super.key and createState() returns the private _MyAppointmentsScreenState that holds everything below.
State: color tokens, tab index, and demo data
class _MyAppointmentsScreenState extends State<MyAppointmentsScreen> {
  static const Color _background = Color(0xFFF9F9FE);
  static const Color _title = Color(0xFF0F0F0F);

  int _selectedTab = 0; // 0 = Active, 1 = History
  int _navIndex = 2; // Document tab, per the design.

  // Demo data. In a real app this comes from your data layer; avatars use
  // network URLs (Pravatar) so the screen needs zero asset setup.
  static const List<Appointment> _activeAppointments = <Appointment>[
    Appointment(
      doctorName: 'Billy Long',
      specialty: 'General Practitioners',
      dateTime: 'Thu, Jan 11 at 09.00 AM - 11.30 AM',
      status: 'Ongoing',
      avatarUrl: 'https://i.pravatar.cc/150?img=12',
    ),
    Appointment(
      doctorName: 'Sophia Martinez',
      specialty: 'Cardiologist',
      dateTime: 'Mon, Jan 15 at 10.00 AM - 11.00 AM',
      status: 'Upcoming',
      avatarUrl: 'https://i.pravatar.cc/150?img=45',
    ),
    Appointment(
      doctorName: 'Daniel Reed',
      specialty: 'Dermatologist',
      dateTime: 'Wed, Jan 17 at 02.30 PM - 03.15 PM',
      status: 'Upcoming',
      avatarUrl: 'https://i.pravatar.cc/150?img=33',
    ),
  ];

  static const List<Appointment> _historyAppointments = <Appointment>[
    Appointment(
      doctorName: 'Emma Wilson',
      specialty: 'Pediatrician',
      dateTime: 'Mon, Dec 18 at 09.30 AM - 10.15 AM',
      status: 'Completed',
      avatarUrl: 'https://i.pravatar.cc/150?img=5',
    ),
    Appointment(
      doctorName: 'James Carter',
      specialty: 'Orthopedic Surgeon',
      dateTime: 'Fri, Dec 08 at 01.00 PM - 02.00 PM',
      status: 'Completed',
      avatarUrl: 'https://i.pravatar.cc/150?img=60',
    ),
    Appointment(
      doctorName: 'Olivia Brown',
      specialty: 'Neurologist',
      dateTime: 'Tue, Nov 28 at 11.00 AM - 11.45 AM',
      status: 'Cancelled',
      avatarUrl: 'https://i.pravatar.cc/150?img=47',
    ),
  ];
The State class defines two design tokens up front — _background (#F9F9FE, a barely-there off-white) and _title (#0F0F0F, near-black) — then two ints that drive the UI: _selectedTab starts at 0 (Active) and _navIndex at 2 (the document tab, matching the design). The bulk here is two static const lists of Appointment records — _activeAppointments and _historyAppointments — each holding doctorName, specialty, a human-readable dateTime string, a status like 'Ongoing' or 'Completed', and a Pravatar avatarUrl. Using network avatar URLs means the screen needs zero bundled image assets.
Scaffold, safe area, and the header
  @override
  Widget build(BuildContext context) {
    return Scaffold(
      backgroundColor: _background,
      body: SafeArea(
        bottom: false,
        child: Column(
          crossAxisAlignment: CrossAxisAlignment.start,
          children: <Widget>[
            const Padding(
              padding: EdgeInsets.fromLTRB(24, 20, 24, 0),
              child: Text(
                'My Appointment',
                style: TextStyle(
                  fontFamily: 'Inter',
                  color: _title,
                  fontSize: 32,
                  fontWeight: FontWeight.w700,
                  height: 1.2,
                ),
              ),
            ),
            const SizedBox(height: 8),
build() returns a Scaffold painted with the off-white _background. SafeArea uses bottom: false so the content clears the status bar at the top while letting the bottom nav bar handle the home indicator itself. Inside, a Column with crossAxisAlignment.start left-aligns everything. The first child is the 'My Appointment' title in 32px, FontWeight.w700 Inter with the _title color and a 1.2 line height, padded 24px in from the sides and 20px down from the top, followed by an 8px SizedBox gap.
Tabs, the swapping list, and bottom nav
            Padding(
              padding: const EdgeInsets.symmetric(horizontal: 24),
              child: SegmentedTabs(
                labels: const <String>['Active', 'History'],
                selectedIndex: _selectedTab,
                onChanged: (int index) =>
                    setState(() => _selectedTab = index),
              ),
            ),
            const SizedBox(height: 16),
            Expanded(
              child: _AppointmentList(
                appointments: _selectedTab == 0
                    ? _activeAppointments
                    : _historyAppointments,
              ),
            ),
          ],
        ),
      ),
      bottomNavigationBar: AppointmentsBottomNav(
        currentIndex: _navIndex,
        onChanged: (int index) => setState(() => _navIndex = index),
      ),
    );
  }
}
The SegmentedTabs widget gets the labels ['Active', 'History'] and the current _selectedTab, and its onChanged calls setState to store the new index — that single line is what makes the tabs interactive. Below it, an Expanded holds _AppointmentList, and the clever bit is its appointments argument: a ternary picks _activeAppointments when _selectedTab == 0, otherwise _historyAppointments, so tapping a tab re-renders the list with the other data set. The Scaffold's bottomNavigationBar is AppointmentsBottomNav, wired the same way — its onChanged setStates _navIndex to highlight the tapped icon.
The reusable appointment list
/// Scrollable list of appointment cards (used for both Active and History).
class _AppointmentList extends StatelessWidget {
  const _AppointmentList({required this.appointments});

  final List<Appointment> appointments;

  @override
  Widget build(BuildContext context) {
    return ListView.separated(
      padding: const EdgeInsets.fromLTRB(13, 0, 13, 24),
      itemCount: appointments.length,
      separatorBuilder: (BuildContext context, int index) =>
          const SizedBox(height: 16),
      itemBuilder: (BuildContext context, int index) {
        return AppointmentCard(
          appointment: appointments[index],
          onSeeDetails: () {},
        );
      },
    );
  }
}
_AppointmentList is a small StatelessWidget that takes a List<Appointment> and renders it with ListView.separated — the right tool when you want consistent gaps between items. Its separatorBuilder inserts a 16px SizedBox between every card, and padding of fromLTRB(13, 0, 13, 24) insets the list and leaves room to scroll past the last card above the nav bar. The itemBuilder returns one AppointmentCard per entry with an empty onSeeDetails callback you can fill in. Because it just takes a list, the same widget powers both the Active and History tabs.
Full code
The complete, ready-to-paste source (4 files). Free to use in your projects — one click copies it all.
import 'package:flutter/material.dart';

import 'widgets/appointment_card.dart';
import 'widgets/bottom_nav_bar.dart';
import 'widgets/segmented_tabs.dart';

/// "My Appointments" — a medical appointments screen (Active / History).
///
/// Self-contained, pure Flutter, no external packages. Renders standalone when
/// pushed as a route — it carries its own colors and type, and does not depend
/// on any app-level theme.
///
/// Bundles its exact design font (Inter) per CONVENTIONS rule 5, and uses
/// network avatars (Pravatar) so it needs zero image-asset setup.
class MyAppointmentsScreen extends StatefulWidget {
  const MyAppointmentsScreen({super.key});

  @override
  State<MyAppointmentsScreen> createState() => _MyAppointmentsScreenState();
}

class _MyAppointmentsScreenState extends State<MyAppointmentsScreen> {
  static const Color _background = Color(0xFFF9F9FE);
  static const Color _title = Color(0xFF0F0F0F);

  int _selectedTab = 0; // 0 = Active, 1 = History
  int _navIndex = 2; // Document tab, per the design.

  // Demo data. In a real app this comes from your data layer; avatars use
  // network URLs (Pravatar) so the screen needs zero asset setup.
  static const List<Appointment> _activeAppointments = <Appointment>[
    Appointment(
      doctorName: 'Billy Long',
      specialty: 'General Practitioners',
      dateTime: 'Thu, Jan 11 at 09.00 AM - 11.30 AM',
      status: 'Ongoing',
      avatarUrl: 'https://i.pravatar.cc/150?img=12',
    ),
    Appointment(
      doctorName: 'Sophia Martinez',
      specialty: 'Cardiologist',
      dateTime: 'Mon, Jan 15 at 10.00 AM - 11.00 AM',
      status: 'Upcoming',
      avatarUrl: 'https://i.pravatar.cc/150?img=45',
    ),
    Appointment(
      doctorName: 'Daniel Reed',
      specialty: 'Dermatologist',
      dateTime: 'Wed, Jan 17 at 02.30 PM - 03.15 PM',
      status: 'Upcoming',
      avatarUrl: 'https://i.pravatar.cc/150?img=33',
    ),
  ];

  static const List<Appointment> _historyAppointments = <Appointment>[
    Appointment(
      doctorName: 'Emma Wilson',
      specialty: 'Pediatrician',
      dateTime: 'Mon, Dec 18 at 09.30 AM - 10.15 AM',
      status: 'Completed',
      avatarUrl: 'https://i.pravatar.cc/150?img=5',
    ),
    Appointment(
      doctorName: 'James Carter',
      specialty: 'Orthopedic Surgeon',
      dateTime: 'Fri, Dec 08 at 01.00 PM - 02.00 PM',
      status: 'Completed',
      avatarUrl: 'https://i.pravatar.cc/150?img=60',
    ),
    Appointment(
      doctorName: 'Olivia Brown',
      specialty: 'Neurologist',
      dateTime: 'Tue, Nov 28 at 11.00 AM - 11.45 AM',
      status: 'Cancelled',
      avatarUrl: 'https://i.pravatar.cc/150?img=47',
    ),
  ];

  @override
  Widget build(BuildContext context) {
    return Scaffold(
      backgroundColor: _background,
      body: SafeArea(
        bottom: false,
        child: Column(
          crossAxisAlignment: CrossAxisAlignment.start,
          children: <Widget>[
            const Padding(
              padding: EdgeInsets.fromLTRB(24, 20, 24, 0),
              child: Text(
                'My Appointment',
                style: TextStyle(
                  fontFamily: 'Inter',
                  color: _title,
                  fontSize: 32,
                  fontWeight: FontWeight.w700,
                  height: 1.2,
                ),
              ),
            ),
            const SizedBox(height: 8),
            Padding(
              padding: const EdgeInsets.symmetric(horizontal: 24),
              child: SegmentedTabs(
                labels: const <String>['Active', 'History'],
                selectedIndex: _selectedTab,
                onChanged: (int index) =>
                    setState(() => _selectedTab = index),
              ),
            ),
            const SizedBox(height: 16),
            Expanded(
              child: _AppointmentList(
                appointments: _selectedTab == 0
                    ? _activeAppointments
                    : _historyAppointments,
              ),
            ),
          ],
        ),
      ),
      bottomNavigationBar: AppointmentsBottomNav(
        currentIndex: _navIndex,
        onChanged: (int index) => setState(() => _navIndex = index),
      ),
    );
  }
}

/// Scrollable list of appointment cards (used for both Active and History).
class _AppointmentList extends StatelessWidget {
  const _AppointmentList({required this.appointments});

  final List<Appointment> appointments;

  @override
  Widget build(BuildContext context) {
    return ListView.separated(
      padding: const EdgeInsets.fromLTRB(13, 0, 13, 24),
      itemCount: appointments.length,
      separatorBuilder: (BuildContext context, int index) =>
          const SizedBox(height: 16),
      itemBuilder: (BuildContext context, int index) {
        return AppointmentCard(
          appointment: appointments[index],
          onSeeDetails: () {},
        );
      },
    );
  }
}
Plus bundled 1 binary asset (fonts/images). The CLI and MCP install those for you automatically.
Two faster ways to add it
Copy-paste works, but you can skip it entirely.
1. FlutterKit CLI
One command drops this screen — and its fonts — straight into your project.
$ flutterkit add doctor-appointments2. AI agent (MCP)
Connect FlutterKit's MCP server in Claude or Cursor and just ask your agent to install doctor-appointments — it fetches and writes the files for you.
FAQ
Is this doctor appointments screen free to use?
Yes. The full Dart source on this page is free to copy into your own apps, personal or commercial. Paste it directly, install it with the FlutterKit CLI (flutterkit add doctor-appointments), or have an AI agent add it for you via MCP.
Does it need any external packages?
No — it's pure Flutter, built entirely on the material library, and the doctor avatars load over the network with Image.network (Pravatar), so there are no image assets to bundle. The one extra asset is the Inter font, which you register in pubspec.yaml as shown in step 2; the CLI and MCP install that font file for you automatically.
Which Flutter version does it target?
Modern Flutter 3.x. The code uses super parameters (super.key) but no Color.withValues, so there's no withOpacity swap to make. On a current stable SDK it compiles as-is; only on a very old pre-3.0 SDK would you rewrite the super.key constructors into the classic Key? key form.
